Category: News

  • Effective Strategies: How To Stop Worrying About Adult Children

    Effective Strategies: How To Stop Worrying About Adult Children

    Worrying about adult children can be exhausting, but there are ways to ease your mind. By setting clear boundaries and fostering open communication, you can build a healthy relationship based on trust and respect. Remember, it’s okay to take a step back and allow them to navigate their own paths. Embrace the idea that you’ve raised capable individuals who are equipped to handle life’s challenges. Let’s explore effective strategies on how to stop worrying about adult children and cultivate peace of mind.

    Effective Strategies: How to Stop Worrying About Adult Children

    How to Stop Worrying About Your Adult Children

    Welcome to our guide on how to stop worrying about your adult children. As parents, it’s natural to care deeply about our children, no matter how old they are. However, constantly worrying about them can impact your mental health and strain your relationship with them. In this article, we will explore effective strategies to help you ease your worries and foster a healthier relationship with your adult children.

    Understanding the Need to Let Go

    One of the first steps in stopping worrying about your adult children is understanding the importance of letting go. As parents, our instinct is to protect and guide our children, but as they grow older, it’s essential to recognize that they need space to make their own decisions and learn from their experiences. Hovering over them with worry can hinder their growth and independence.

    It’s crucial to acknowledge that your adult children are capable individuals who have their own lives to lead. Trust that you have raised them to make sound choices and handle challenges on their own. Remember, worrying excessively won’t change the outcome of their decisions; it will only affect your well-being.

    Communicate Openly and Set Boundaries

    Effective communication is key to reducing worry and strengthening your relationship with your adult children. Have honest conversations with them about your concerns, but also listen to their perspectives without judgment. Encourage open dialogue where both parties can express their feelings and thoughts openly.

    Setting healthy boundaries is also essential in alleviating worry. Boundaries help establish a clear understanding of each other’s expectations and limitations. It’s okay to offer support and guidance, but it’s equally important to give them the space to handle their responsibilities and decisions independently.

    Focus on Self-Care

    Worrying about your adult children can consume your thoughts and emotions, leading to stress and anxiety. Prioritize self-care to maintain your well-being and manage your worries effectively. Take time for activities that bring you joy and relaxation, such as hobbies, exercise, or spending time with friends and family.

    Practicing mindfulness and relaxation techniques, such as meditation or deep breathing exercises, can help calm your mind and reduce anxiety. Remember that taking care of yourself is not selfish; it’s essential for your mental and emotional health, enabling you to support your adult children from a place of strength.

    Trust in Their Abilities

    Trust plays a significant role in letting go of worry. Trust in your adult children’s abilities to navigate life’s challenges and make decisions that are best for them. Remind yourself of the values and skills you have instilled in them throughout their upbringing, and have faith that they will apply them when faced with difficult situations.

    Acknowledge that making mistakes is a natural part of learning and growth. Instead of dwelling on worst-case scenarios, focus on empowering your adult children to learn from their experiences and become resilient individuals. Trust that they have the resilience and determination to overcome obstacles and emerge stronger.

    Seek Support When Needed

    If your worries about your adult children become overwhelming, don’t hesitate to seek support from a therapist or counselor. Talking to a mental health professional can provide you with coping strategies and tools to manage your anxiety effectively. They can offer a fresh perspective on your concerns and help you develop healthier ways to support your adult children.

    Additionally, connecting with other parents who are experiencing similar worries can provide a sense of community and understanding. Joining support groups or online forums can offer a safe space to share your feelings and seek advice from individuals who are going through similar challenges.

    Celebrate Their Successes

    As you work on letting go of worry, remember to celebrate the successes of your adult children. Acknowledge their achievements, no matter how big or small, and express pride in their accomplishments. By focusing on their positive moments, you can shift your perspective from worry to appreciation and encouragement.

    Encourage open communication where they can share their triumphs with you, fostering a supportive and loving relationship. Celebrating their successes not only boosts their confidence but also reinforces your belief in their capabilities, strengthening your bond as parent and child.

    In conclusion, learning how to stop worrying about your adult children is a process that requires trust, communication, self-care, and support. By understanding the need to let go, communicating openly, focusing on self-care, trusting in their abilities, seeking support when needed, and celebrating their successes, you can ease your worries and cultivate a healthier relationship with your adult children.

    Remember to practice patience and compassion with yourself as you navigate this journey. Your love and support will always be valuable to your adult children, even as they continue to grow and thrive on their own paths.

    How to stop worrying about your grown child

    Frequently Asked Questions

    How can I manage my worries about my adult children?

    To manage worries about your adult children, it’s essential to focus on what is within your control. Stay connected with your children through open communication and offer support when needed, but also allow them the space to make their own decisions and learn from their experiences. Engage in self-care activities that can help reduce stress and anxiety, such as mindfulness exercises, hobbies, or seeking support from friends or a therapist.

    What are some practical ways to support adult children without worrying excessively?

    You can support your adult children by being a good listener, providing guidance when asked for, and offering encouragement. Setting healthy boundaries is crucial to prevent over-involvement and maintain a healthy parent-child relationship. Trusting your children’s abilities to handle challenges and respecting their autonomy can also help reduce unnecessary worries.

    How can I shift my focus from worrying to enjoying my relationship with my adult children?

    One way to shift your focus from worrying to enjoying your relationship with your adult children is to practice gratitude. Reflect on the positive aspects of your relationship and celebrate their accomplishments and growth. Engaging in activities together, whether in person or virtually, can strengthen your bond and create joyful memories that overshadow worries. Remember to prioritize your well-being and pursue activities that bring you joy and fulfillment outside of your role as a parent.

    Final Thoughts

    To stop worrying about adult children, establish clear boundaries and let go of the need to control their choices. Communicate openly and express your concerns without judgment. Trust in their abilities and allow them to learn from their own experiences. Remember, your role is now to offer support and guidance, rather than fix every problem. Ultimately, embracing this shift in perspective will reduce anxiety and strengthen your relationship with your adult children.

  • Sewing Without A Needle: Ultimate Guide To How To Sew Without A Needle

    Sewing Without A Needle: Ultimate Guide To How To Sew Without A Needle

    Sewing without a needle is indeed possible! With a few clever techniques and tools, you can achieve beautiful stitches without the need for a traditional needle and thread. Whether you’re caught without a needle or simply want to try something new, this innovative approach opens up a world of possibilities for your sewing projects. Let’s explore the exciting methods and resources that will enable you to master the art of sewing without a needle.

    Sewing Without a Needle: Ultimate Guide to How to Sew Without a Needle

    Exploring the Art of Sewing Without a Needle: A Fun and Innovative Guide

    Are you ready to embark on a creative journey where you can sew without a needle? Yes, you read that right! In this article, we will delve into the fascinating world of needle-free sewing techniques that will ignite your imagination and unleash your inner designer. Whether you’re a crafting enthusiast or a curious beginner, get ready to explore new ways to bring your fabric projects to life without the traditional tool of a needle.

    Introduction to Needle-Free Sewing

    Sewing without a needle may sound like a magical concept, but it is entirely possible with the right tools and techniques. From fabric adhesives to innovative sewing gadgets, there are numerous methods available to help you create beautiful stitches and seams without ever picking up a needle and thread. Let’s dive into the exciting world of needle-free sewing and discover how you can unleash your creativity in unique ways.

    Tools and Materials for Needle-Free Sewing

    Before you begin your needle-free sewing adventure, it’s essential to gather the right tools and materials. Here are some key items you’ll need to get started:

    Fabric Adhesive:

    Fabric adhesive is a versatile and convenient alternative to traditional sewing. It allows you to bond fabric pieces together without the need for stitching. Choose a high-quality fabric adhesive that is durable and washable for long-lasting results.

    Fabric Tape:

    Fabric tape is another handy tool for needle-free sewing. It works like regular tape but is designed specifically for fabric. Fabric tape can be used to hem garments, attach patches, and secure seams without sewing.

    Fabric Glue Dots:

    Fabric glue dots are small adhesive dots that provide a strong bond between fabric layers. They are perfect for quick fixes and temporary sewing projects.

    Fusible Web:

    Fusible web is a thin adhesive material that can be ironed onto fabric layers to bond them together. It is commonly used for appliqué work and creating intricate designs without sewing.

    Needle-Free Sewing Techniques

    Now that you have your tools and materials ready, it’s time to explore some needle-free sewing techniques that will elevate your fabric projects to new heights. Let’s dive into the exciting world of needle-free stitching:

    No-Sew Appliqué:

    Appliqué is a decorative technique where fabric shapes are attached to a base fabric to create intricate designs. With the no-sew appliqué method, you can use fabric adhesive or fusible web to bond the appliqué pieces to your project without stitching.

    Hemming with Fabric Tape:

    Hemming is a common sewing technique used to finish raw edges of fabric. With fabric tape, you can easily hem garments and household items without sewing. Simply apply the fabric tape to the edge of the fabric, fold it over, and press to secure the hem in place.

    Fabric Patching with Glue Dots:

    If you have a fabric tear or hole that needs fixing, fabric glue dots are your go-to solution. Simply place a fabric glue dot on the back of the patch and press it onto the damaged area to secure it in place. It’s a quick and easy way to patch up fabric without sewing.

    Creating No-Sew Fabric Crafts:

    From no-sew pillows to fabric banners, there are endless possibilities for creating beautiful fabric crafts without a needle. Let your imagination run wild and experiment with different needle-free sewing techniques to bring your creative ideas to life.

    Benefits of Sewing Without a Needle

    Sewing without a needle opens up a world of possibilities for creative individuals of all ages. Whether you’re looking to save time on sewing projects or want to explore new ways to express your creativity, needle-free sewing offers several benefits:

    – Quick and easy alternative to traditional sewing
    – Ideal for beginners or those with limited sewing skills
    – Perfect for quick repairs and alterations
    – Allows for experimentation and creative freedom in fabric projects

    In conclusion, needle-free sewing is a fun and innovative way to create beautiful fabric projects without the use of a traditional needle and thread. By exploring the various tools and techniques available, you can unleash your creativity and bring your design ideas to life in unique ways. Whether you’re working on a simple craft project or tackling a more intricate design, needle-free sewing opens up a world of possibilities for creative expression. So, why wait? Grab your tools and materials, and start sewing without a needle today!

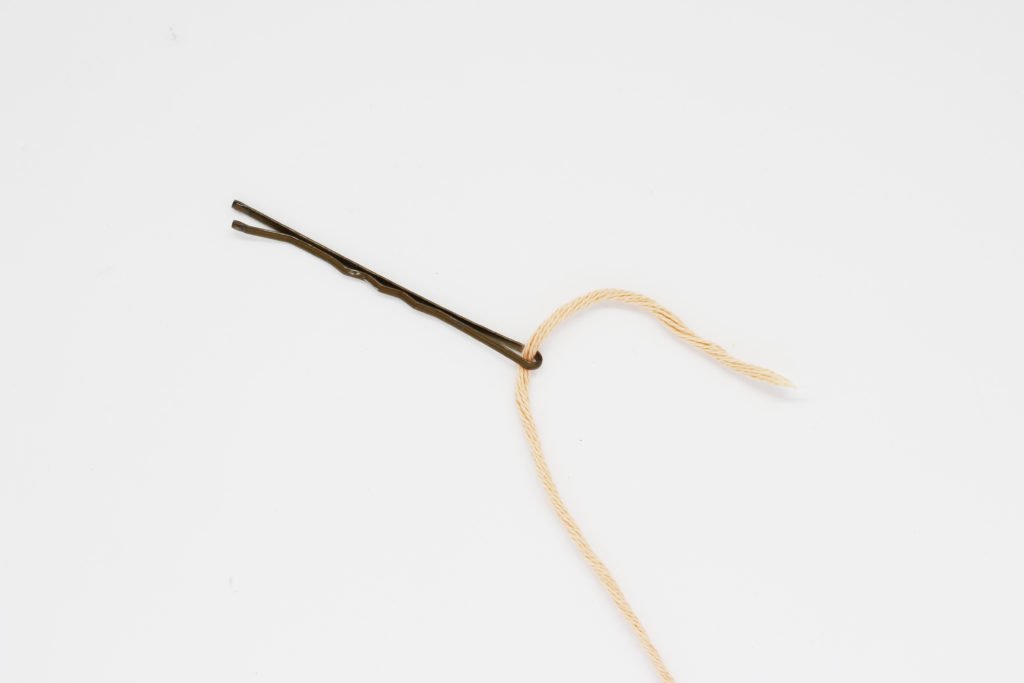
    paper clip sewing needle

    Frequently Asked Questions

    Can I sew without using a needle?

    Yes, you can sew without a needle by using alternatives such as fabric glue, fusible tape, or adhesive patches. These options offer a quick and easy way to create temporary or permanent seams without the need for a needle and thread.

    What are some tools or materials I can use to sew without a needle?

    Some tools and materials you can use to sew without a needle include fabric glue, double-sided fusible tape, iron-on patches, fabric adhesive, or a handheld sewing machine. These alternatives provide different ways to attach fabrics together without traditional sewing methods.

    Is sewing without a needle suitable for all types of fabric?

    Sewing without a needle using alternatives like fabric glue or fusible tape works best on lighter weight fabrics such as cotton, polyester, or blends. Thicker fabrics like denim or leather may require a stronger adhesive or a different technique to ensure a secure bond.

    Can I create durable and long-lasting seams when sewing without a needle?

    While sewing without a needle can be convenient for quick fixes or temporary projects, the durability of the seams may vary depending on the method and materials used. To create more long-lasting seams without a needle, consider reinforcing the bond with additional stitching or using a stronger adhesive specifically designed for fabric.

    Final Thoughts

    In conclusion, sewing without a needle is a practical skill that can be achieved using alternative methods like fabric glue or adhesive tape. These techniques offer convenience and save time for quick fixes on the go. Remember, mastering how to sew without a needle opens up a world of possibilities for DIY projects and repairs. Embrace creativity and experimentation to find the best method that works for you. Happy sewing!

  • Exploring How Many Teaspoons In 2 Oz: A Practical Guide

    Exploring How Many Teaspoons In 2 Oz: A Practical Guide

    There are approximately 12 teaspoons in 2 oz, making it a common measurement conversion that many encounter in their kitchen endeavors. Whether you’re preparing a recipe or simply need to convert units for a specific purpose, knowing how many teaspoons are in 2 oz can be quite handy. This simple conversion can save you time and effort, ensuring your culinary creations turn out just right. So, let’s delve into this conversion and unravel the mystery of how many teaspoons are in 2 oz.

    Exploring How Many Teaspoons in 2 oz: A Practical Guide


    Exploring the Mystery: How Many Teaspoons in 2 oz?

    Welcome to our informative guide where we delve into the world of measurements and answer the age-old question – how many teaspoons are there in 2 oz? Whether you’re a budding chef or just curious about the wonders of cooking, understanding these measurements can make a big difference in your culinary endeavors. So, let’s embark on this exciting journey together!

    The Basics of Teaspoons and Ounces

    Before we dive into the specifics of teaspoons and ounces, let’s get acquainted with the basics. A teaspoon is a small unit of volume often used in cooking to measure ingredients such as spices, salt, and sugar. On the other hand, an ounce is a unit of weight or mass commonly used in the culinary world to measure both liquid and dry ingredients.

    Decoding the Conversion:

    When it comes to converting ounces to teaspoons, the process can seem a bit tricky at first. However, fear not, as we’re here to simplify it for you! In general, the conversion rate for ounces to teaspoons varies depending on the ingredient’s density and weight.

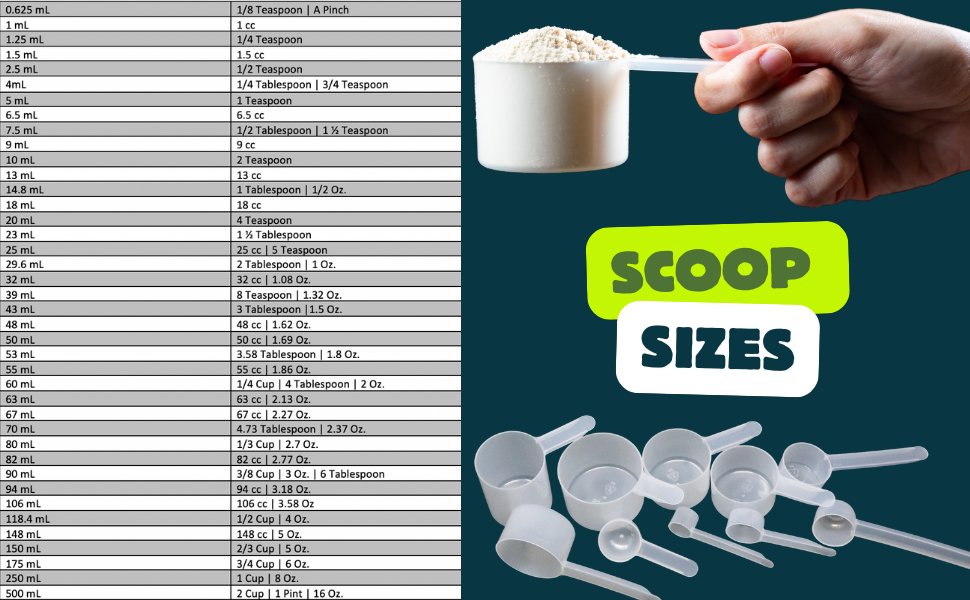
    For liquids such as water or milk, the conversion is straightforward. One fluid ounce is equivalent to approximately 6 teaspoons. So, if we have 2 fluid ounces, we can calculate that as 2 oz x 6 tsp = 12 teaspoons.

    Understanding Different Ingredients:

    It’s important to note that not all ingredients have the same conversion rate from ounces to teaspoons. Some ingredients are denser or lighter, affecting the overall conversion. For example, ingredients like salt and sugar are heavier, so their conversion rate may differ compared to liquids.

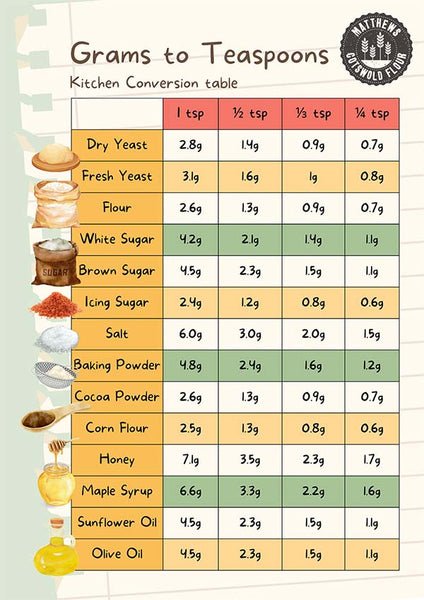
    When working with ingredients like salt or sugar, where the density plays a significant role, the conversion rate can vary. Typically, 1 ounce of granulated sugar is equal to about 5 teaspoons, while 1 ounce of salt is approximately 6 teaspoons.

    Practical Applications: Using Measurements in Cooking

    Now that we’ve uncovered the mystery of how many teaspoons are in 2 oz let’s explore how these measurements can be applied in everyday cooking. Whether you’re following a recipe or experimenting in the kitchen, understanding these measurements is crucial for achieving the perfect dish.

    Measuring Ingredients Precisely:

    Accurate measurement of ingredients is essential for the success of any recipe. Using the right amount of each component ensures that your dish turns out flavorful and well-balanced. So, the next time you’re preparing a meal, remember to measure your ingredients carefully using teaspoons and ounces!

    Converting Recipes:

    Have you ever come across a recipe that uses ounces but prefer using teaspoons for measurement? Understanding the conversion between these units can help you adapt the recipe to your preferred measurements. By knowing how to convert ounces to teaspoons, you can easily modify recipes to suit your cooking style.

    As we wrap up our exploration into the world of measurements, we hope you’ve gained a better understanding of how many teaspoons are in 2 oz. Remember, measurements play a vital role in cooking, and knowing how to convert between different units can elevate your culinary skills to new heights.

    So, the next time you’re in the kitchen, don’t shy away from experimenting with different measurements and units. Embrace the world of cooking with confidence, armed with the knowledge of teaspoons, ounces, and everything in between!


    Conversion Chart || Grams || Ml || Cups || Tablespoon || Teaspoon || measurements

    Frequently Asked Questions

    How many teaspoons are in 2 oz?

    There are approximately 6 teaspoons in 2 oz. This measurement is based on the standard conversion that 1 fluid ounce is equivalent to 6 teaspoons.

    Can I convert ounces to teaspoons for any liquid ingredient?

    Yes, you can convert ounces to teaspoons for most liquid ingredients that are commonly used in cooking and baking. This conversion is particularly helpful when you need to be precise with your measurements.

    Why is it important to know how many teaspoons are in 2 oz?

    Knowing how many teaspoons are in 2 oz can help you accurately measure and use ingredients in recipes that require precise measurements. This knowledge ensures that your dishes turn out as intended and are balanced in flavor.

    Is the conversion from ounces to teaspoons the same for all types of liquids?

    While the general conversion from ounces to teaspoons is consistent, it’s important to note that the density of different liquids can vary. This can slightly affect the actual volume of teaspoons in a particular amount of liquid ounces.

    Final Thoughts

    In conclusion, there are approximately 12 teaspoons in 2 oz. Understanding the conversion of liquid ounces to teaspoons can be beneficial in precise cooking and baking measurements. Knowing ‘how many teaspoons in 2 oz’ streamlines the process and ensures recipe accuracy. Mastering this conversion can elevate your culinary skills and boost confidence in the kitchen.

  • Create Blue Raspberry Flavor: How To Make Blue Raspberry Flavor

    Create Blue Raspberry Flavor: How To Make Blue Raspberry Flavor

    To make blue raspberry flavor, you’ll need to combine the sweetness of ripe raspberries with the vibrant hue of blue coloring. Start by crushing fresh raspberries to extract their essence. Then, carefully blend in a touch of blue food coloring to achieve that iconic blue raspberry shade. The result is a delightful fusion of fruity sweetness and tantalizing color that will elevate any recipe. Dive into the world of creating your own blue raspberry flavor and unlock a burst of unique taste sensations in your culinary creations.

    Create Blue Raspberry Flavor: How to Make Blue Raspberry Flavor

    How to Make Blue Raspberry Flavor: A Step-by-Step Guide

    Welcome to our guide on how to create your very own delicious blue raspberry flavor! Blue raspberry is a popular and refreshing taste that is enjoyed in many treats, from candies to beverages. In this article, we will walk you through the process of making your own blue raspberry flavor from scratch. Let’s dive in!

    Understanding Blue Raspberry Flavor

    Before we jump into the recipe, it’s essential to understand what gives blue raspberry its distinctive taste. Contrary to what the name suggests, blue raspberries do not actually exist. The flavor is an artificial creation that combines the sweet taste of ripe raspberries with a hint of tanginess and a vibrant blue color.

    Ingredients You’ll Need

    Here are the ingredients you’ll need to make your blue raspberry flavor:

    • Fresh or frozen raspberries
    • Blue food coloring
    • Sugar
    • Fresh lemon juice
    • Water

    Step 1: Prepare the Raspberries

    Start by washing your raspberries thoroughly to remove any dirt or debris. If you’re using frozen raspberries, make sure they are completely thawed before proceeding. Raspberries are the key ingredient that will give your flavor its fruity base.

    Step 2: Create the Raspberry Puree

    In a blender or food processor, blend the raspberries until they form a smooth puree. You can strain the puree through a fine-mesh sieve to remove the seeds if desired, but keeping the seeds can add a nice texture to your flavor.

    Step 3: Make the Blue Raspberry Syrup

    In a saucepan, combine equal parts of the raspberry puree and water. Add sugar to taste, depending on how sweet you want your flavor to be. Heat the mixture over low heat, stirring constantly until the sugar has dissolved completely.

    Step 4: Add the Blue Hue

    To achieve the iconic blue color of blue raspberry, add a few drops of blue food coloring to the syrup. Stir well until the color is evenly distributed. You can adjust the intensity of the blue by adding more or less food coloring as needed.

    Step 5: Balance the Flavors

    To give your blue raspberry flavor a tangy kick, add a splash of fresh lemon juice to the syrup. The lemon juice will help brighten the flavor and provide a perfect balance between sweetness and tartness.

    Step 6: Let It Cool

    Once you’ve achieved the desired taste and color, remove the syrup from the heat and let it cool to room temperature. As it cools, the flavors will meld together, creating a harmonious blue raspberry flavor that is ready to be used in your favorite recipes.

    Ways to Enjoy Blue Raspberry Flavor

    Now that you’ve mastered the art of making blue raspberry flavor, here are some fun ways to enjoy it:

    • Make blue raspberry lemonade by adding the syrup to freshly squeezed lemon juice and water.
    • Create blue raspberry popsicles by freezing the syrup in popsicle molds.
    • Drizzle the blue raspberry syrup over vanilla ice cream for a colorful and tasty treat.

    Congratulations! You now know how to make your very own blue raspberry flavor from scratch. Experiment with different ratios of ingredients to customize the flavor to your liking. Whether you’re crafting homemade candies, beverages, or desserts, your homemade blue raspberry flavor is sure to impress. Have fun creating and enjoy the sweet and tangy taste of blue raspberry!

    JT Cafe – Blue Raspberry Italian Soda

    Frequently Asked Questions

    How can I make blue raspberry flavor at home?

    To make blue raspberry flavor at home, you can combine raspberry and blueberry flavors. Start by mixing raspberry extract or flavoring with a few drops of blue food coloring. Adjust the ratio of the two flavors to achieve the desired balance between raspberry and blueberry notes. You can also add a hint of citrus, like lemon or lime juice, to enhance the tangy aspect of the flavor.

    What ingredients do I need to make blue raspberry flavor?

    You will need raspberry extract or flavoring, blue food coloring, and optionally, citrus juice such as lemon or lime. Make sure to use high-quality ingredients for a more authentic flavor. Adjust the quantities based on your taste preferences and the intensity of the colors you want to achieve.

    Can I make a natural blue raspberry flavor?

    While traditional blue raspberry flavor is often associated with artificial coloring, you can still create a more natural version at home. Start with fresh raspberries and blueberries to extract their flavors. Mix the two fruit extracts and consider using natural blue food coloring options like butterfly pea flower extract for a vibrant blue color.

    Final Thoughts

    In conclusion, creating a delightful blue raspberry flavor is simple. Start by combining raspberry and blue coloring for a vibrant hue. Then, infuse a dash of citric acid for a zesty kick. Experiment with different sweeteners to find the perfect balance. By following these steps, you can easily make blue raspberry flavor at home.

  • Calculating Electricity Consumption: How Much Electricity Does A Ceiling Fan Use In 24 Hours

    Calculating Electricity Consumption: How Much Electricity Does A Ceiling Fan Use In 24 Hours

    Ceiling fans are popular for their energy efficiency, but have you ever wondered how much electricity does a ceiling fan use in 24 hours? The answer might surprise you. On average, a ceiling fan consumes around 60 to 75 watts per hour. Over a 24-hour period, this translates to approximately 1.44 to 1.8 kilowatt-hours of electricity. Understanding the energy consumption of your ceiling fan can help you make informed decisions about energy usage in your home.

    Calculating Electricity Consumption: How Much Electricity Does a Ceiling Fan Use in 24 Hours

    How Much Electricity Does a Ceiling Fan Use in 24 Hours

    Welcome, curious minds! Have you ever wondered how much electricity your trusty ceiling fan consumes in a day? Well, fret not, for today we are diving deep into the world of ceiling fans and their energy consumption. So, sit back, grab a snack, and let’s explore the fascinating realm of electricity usage by ceiling fans over a 24-hour period.

    The Basics of Ceiling Fans

    Before we delve into the specifics of electricity usage, let’s brush up on our knowledge of ceiling fans. These magical contraptions have been keeping us cool for decades, circulating air to create a refreshing breeze, especially during those hot summer days. Not only do they provide comfort, but they can also help save on energy bills when used efficiently.

    Calculating Electricity Usage

    Now, let’s get to the heart of the matter – how much electricity does a ceiling fan actually use in 24 hours? The energy consumption of a ceiling fan depends on several factors such as the fan’s wattage, the speed setting, and the number of hours it runs.

    Wattage of Ceiling Fans

    Ceiling fans come in various sizes and models, each with its own wattage rating. On average, a typical ceiling fan consumes around 60 watts per hour when running at full speed. However, newer models with energy-efficient features may consume less electricity.

    Speed Settings

    Most ceiling fans have multiple speed settings that allow you to adjust the fan’s rotation speed. The energy consumption of the fan will vary depending on the speed setting used. Running the fan at a higher speed will consume more electricity compared to a lower speed setting.

    Calculating Daily Electricity Usage

    To calculate how much electricity your ceiling fan uses in a day, you can follow a simple formula. Multiply the wattage of your ceiling fan by the number of hours it runs in a day. For example, if your fan consumes 60 watts per hour and runs for 24 hours, the total electricity usage would be 60 watts x 24 hours = 1440 watt-hours per day.

    Energy Efficiency Tips

    While ceiling fans are a cost-effective way to stay cool, there are ways to make them even more energy-efficient. Here are some tips to help you reduce your electricity consumption while using a ceiling fan:

    Use Fans Wisely

    Turn off the fan when you are not in the room to avoid unnecessary energy consumption. Also, consider using a fan timer to automatically switch off the fan after a set period.

    Optimize Fan Settings

    Running the fan at a moderate speed can still provide adequate cooling while consuming less electricity. Experiment with different speed settings to find the optimal balance between comfort and energy efficiency.

    Combine with Air Conditioning

    Using a ceiling fan in conjunction with an air conditioner can help distribute cool air more effectively, allowing you to set the thermostat higher and reduce the load on your AC unit.

    So there you have it, dear readers – a comprehensive guide to understanding how much electricity your ceiling fan uses in 24 hours. By being mindful of your fan’s wattage, speed settings, and usage patterns, you can optimize energy efficiency and keep both your pocket and the planet happy. Remember, small changes in your daily habits can go a long way in saving energy and reducing your carbon footprint. Stay cool, stay curious, and keep exploring the wonders of electricity consumption!

    How Much Electricity Does Fan Consume in 24 Hours #shorts

    Frequently Asked Questions

    How can I calculate the electricity consumption of a ceiling fan in 24 hours?

    To calculate the electricity usage of a ceiling fan in 24 hours, you need to know the wattage of the fan. Most ceiling fans consume around 50-100 watts per hour. Multiply the wattage by the number of hours the fan runs in a day (24 hours) to get the total electricity consumption in watt-hours for that day.

    What factors can affect the electricity consumption of a ceiling fan in 24 hours?

    Factors that can affect the electricity consumption of a ceiling fan include the fan’s wattage, the speed at which it operates, and the duration for which it is used. Higher wattage fans, running at higher speeds for longer periods, will consume more electricity.

    Is it cost-effective to run a ceiling fan continuously for 24 hours in terms of electricity usage?

    Running a ceiling fan continuously for 24 hours can lead to higher electricity consumption, especially if the fan has a high wattage. It is generally more cost-effective to use the fan only when needed and to turn it off when not in use to save on electricity costs.

    Final Thoughts

    In conclusion, the amount of electricity a ceiling fan uses in 24 hours depends on its wattage. On average, a ceiling fan consumes around 75 watts per hour. Over a 24-hour period, this equates to approximately 1.8 kilowatt-hours of electricity. It’s important to choose an energy-efficient ceiling fan to minimize electricity usage in the long run. So, if you’re wondering how much electricity does a ceiling fan use in 24 hours, remember to consider its wattage for optimal energy efficiency.

  • Ultimate Guide: Frida Windi How To Use – Top Tips!

    Ultimate Guide: Frida Windi How To Use – Top Tips!

    Frida Windi – a game-changer in gas relief. Wondering how to use Frida Windi to help your little one find comfort? Look no further. Frida Windi is a simple, effective tool to ease your baby’s discomfort caused by gas. In this article, we will guide you through the easy steps on how to use Frida Windi like a pro. Say goodbye to tummy troubles with Frida Windi at your side.

    Ultimate Guide: Frida Windi How to Use - Top Tips!

    Mastering Frida Windi: A Step-by-Step Guide on How to Use It

    Imagine never having to worry about feeling uncomfortable or bloated due to gas or constipation. With Frida Windi, these concerns can be a thing of the past. In this comprehensive guide, we will explore everything you need to know about Frida Windi and how to use it effectively to alleviate gas and constipation issues.

    What is Frida Windi?

    Frida Windi is a revolutionary tool designed to help relieve gas and constipation in a safe and gentle manner. It is a rectal catheter that allows for the easy release of gas and stool from the body, providing fast relief from discomfort. Frida Windi is made from soft, flexible material and is specifically designed for ease of use, making it suitable for all ages.

    Why Use Frida Windi?

    Gas and constipation are common problems that can cause significant discomfort and pain. While there are various remedies available, Frida Windi offers a quick and effective solution that is gentle on the body. Unlike traditional methods such as laxatives or suppositories, Frida Windi provides instant relief without the need for harsh chemicals or medications.

    The Benefits of Using Frida Windi

    – Fast relief from gas and constipation
    – Non-invasive and gentle on the body
    – Easy to use for all ages
    – Helps prevent bloating and discomfort

    How to Use Frida Windi

    Using Frida Windi is a simple and straightforward process that can be done in the comfort of your own home. Follow these step-by-step instructions to master the art of using Frida Windi:

    Step 1: Preparation

    Before using Frida Windi, it is essential to ensure that you are in a comfortable position. You can lie down on your side with your knees bent or assume a squatting position. Make sure to have a clean and flat surface to work on.

    Step 2: Lubrication

    Apply a small amount of water-based lubricant to the tip of the Frida Windi catheter. This will help facilitate easy insertion and prevent any discomfort.

    Step 3: Insertion

    Gently insert the lubricated tip of Frida Windi into the rectum, aiming towards the belly button. It is essential to do this slowly and carefully to avoid any injury. Once the catheter is in place, hold it firmly but gently.

    Step 4: Release

    Once Frida Windi is inserted correctly, gently squeeze the bulb at the other end of the catheter to release the gas or stool. You should feel relief almost instantly as the pressure is alleviated from your abdomen.

    Step 5: Removal

    After releasing the gas or stool, carefully remove Frida Windi from the rectum. Clean the catheter thoroughly with mild soap and warm water before storing it in a dry and clean place for future use.

    Tips for Using Frida Windi Safely

    – Always read the instructions carefully before using Frida Windi.
    – Use water-based lubricant to ensure smooth insertion.
    – Do not force the catheter if you encounter resistance.
    – Clean Frida Windi thoroughly after each use to maintain hygiene.

    In conclusion, Frida Windi is a simple yet effective tool for relieving gas and constipation. By following the steps outlined in this guide, you can master the art of using Frida Windi and enjoy fast relief from discomfort. Say goodbye to bloating and gas pains with Frida Windi – your trusted partner in digestive health!

    WINDI THE GASPASSER

    Frequently Asked Questions

    How can I use Frida Windi for my baby?

    To use Frida Windi, gently insert the tip into your baby’s rectum and apply light pressure to help release gas or stool. Make sure to use a liberal amount of lubricant to ease the insertion process. The soft, flexible design of Frida Windi makes it safe and easy to use on your baby.

    Is it safe to use Frida Windi on newborns?

    Yes, Frida Windi is safe to use on newborns. The gentle design and soft material ensure that it is comfortable and non-invasive for your baby. Make sure to follow the instructions carefully and use a gentle touch when using Frida Windi on your newborn.

    How often can I use Frida Windi for my baby?

    You can use Frida Windi as often as needed for your baby. It is safe and gentle enough to use multiple times a day if necessary. However, always monitor your baby’s comfort level and consult with a healthcare professional if you have any concerns about excessive use.

    Final Thoughts

    In conclusion, utilizing Frida Windi is simple and effective. By following a few straightforward steps, users can experience relief from nasal congestion and sinus pressure. Frida Windi’s innovative design allows for gentle and safe nasal aspiration. Remember to carefully read and follow the instructions for the best results when using Frida Windi to alleviate discomfort associated with congestion.

  • Determining How Many Reiki Sessions Are Needed

    Determining How Many Reiki Sessions Are Needed

    The number of Reiki sessions needed varies based on individual needs and goals. Some may experience benefits after just one session, while others may benefit from a series of sessions for long-lasting effects. Factors such as the issue being addressed, one’s overall health, and stress levels can influence the number of sessions required. Understanding how many Reiki sessions are needed for your specific situation can lead to a more effective and personalized healing journey. Let’s delve deeper into this topic to help you make informed decisions about your Reiki experience.

    Determining How Many Reiki Sessions are Needed

    How Many Reiki Sessions Are Needed: A Comprehensive Guide

    Welcome to our guide on how many Reiki sessions are needed to experience the full benefits of this ancient healing technique. If you’re new to Reiki or considering incorporating it into your wellness routine, you’re likely wondering how many sessions are required to see results. In this article, we will delve into the factors that influence the number of sessions needed, share insights from experts, and provide practical tips to help you make the most of your Reiki journey.

    The Basics of Reiki

    Before we dive into the number of sessions needed, let’s start with a brief overview of what Reiki is all about. Reiki is a form of energy healing that originated in Japan. The word “Reiki” can be broken down into two parts: “Rei,” which means universal or divine, and “Ki,” which refers to the life force energy that flows through all living beings.

    During a Reiki session, a practitioner channels this universal energy and directs it to the recipient through gentle touch or by holding their hands slightly above the body. The goal of Reiki is to promote relaxation, reduce stress, and facilitate healing on physical, emotional, and spiritual levels.

    Factors Influencing the Number of Reiki Sessions

    The number of Reiki sessions needed can vary depending on several factors. Understanding these factors can help set realistic expectations and guide you in determining the right approach for your individual needs. Here are some key factors to consider:

    1. Goals and Intentions

    One of the primary factors that influence the number of Reiki sessions needed is the individual’s goals and intentions for seeking Reiki treatment. Are you looking to address a specific physical ailment, relieve emotional stress, or simply experience overall relaxation and well-being? The more specific your goals are, the better equipped your practitioner will be to tailor the sessions to meet your needs.

    2. Severity of Issues

    The severity and duration of the issues you are looking to address through Reiki play a significant role in determining the number of sessions required. For chronic or long-standing issues, multiple sessions may be needed to achieve lasting results. On the other hand, if you are seeking Reiki for general relaxation and maintenance, fewer sessions may suffice.

    3. Individual Response

    Each individual responds to Reiki treatment differently. Some people may experience immediate and profound benefits after just one session, while others may require multiple sessions to notice significant changes. Factors such as sensitivity to energy, openness to healing, and overall health can influence how quickly you respond to Reiki.

    4. Practitioner’s Expertise

    The skill and experience of the Reiki practitioner also play a crucial role in determining the effectiveness of the sessions. A well-trained and intuitive practitioner can often achieve results more efficiently, potentially requiring fewer sessions to address your needs.

    Optimal Number of Reiki Sessions

    While the number of Reiki sessions needed can vary from person to person, practitioners often recommend starting with a series of sessions to experience the full benefits of Reiki. Typically, a series of three to six sessions is considered a good starting point for most individuals.

    During this initial series of sessions, you may begin to notice subtle shifts in your energy, emotions, or physical well-being. These sessions help lay the foundation for deeper healing and provide an opportunity to assess how your body responds to Reiki energy.

    After the initial series, your practitioner may recommend additional sessions based on your progress and goals. Some individuals choose to continue regular Reiki sessions as part of their self-care routine to maintain balance and support overall well-being.

    Personalizing Your Reiki Journey

    Regardless of the recommended number of sessions, it’s essential to communicate openly with your Reiki practitioner about your experiences and progress. Your practitioner can help adjust the frequency and duration of sessions based on your feedback and evolving needs.

    Remember that Reiki is a personal and holistic practice that honors the individual’s unique journey toward healing and self-discovery. Trust your intuition and listen to your body to determine how many Reiki sessions feel right for you.

    In conclusion, the number of Reiki sessions needed is a personal and individualized journey that depends on various factors such as goals, severity of issues, individual response, and practitioner expertise. By staying open to the healing process and communicating effectively with your practitioner, you can find the optimal number of sessions to support your well-being and growth.

    Whether you’re seeking relief from physical discomfort, emotional stress, or simply looking to enhance your overall wellness, Reiki offers a gentle and transformative approach to healing. Embrace the journey, trust in the power of energy healing, and allow yourself to experience the profound benefits of Reiki.

    We hope this guide has provided you with valuable insights into the world of Reiki and how to navigate the question of how many sessions are needed. Remember, each Reiki session is a step forward on your path to healing and self-discovery. May your Reiki journey be filled with light, love, and profound healing experiences.

    What is Reiki? | A Short Film

    Frequently Asked Questions

    How many Reiki sessions are typically recommended for optimal results?

    On average, individuals typically benefit from a series of Reiki sessions to experience the full effects of the energy healing. It is recommended to start with a set of around 4-6 sessions initially, spaced a week apart, to allow for the energy to work thoroughly within the body and address any underlying imbalances.

    Is there a specific guideline for determining how many Reiki sessions an individual needs?

    The number of Reiki sessions required can vary depending on the individual’s specific needs and goals. Factors such as the severity of the issue being addressed, one’s receptivity to energy healing, and overall response to the sessions can all influence the recommended number of sessions. A Reiki practitioner may provide guidance based on their assessment and experience.

    Can someone benefit from just one Reiki session, or is multiple sessions necessary?

    While even a single Reiki session can provide relaxation and some benefits, for more profound and lasting effects, multiple sessions are typically recommended. Consistent sessions help to build upon each other, allowing the energy to work more deeply within the body and promoting overall well-being in a more sustained manner.

    Final Thoughts

    In conclusion, the number of Reiki sessions needed varies based on individual needs. Some may experience benefits after just one session, while others may require multiple sessions for lasting effects. Consistency in attending sessions and open-mindedness play a key role in the efficacy of Reiki. It is recommended to discuss with a Reiki practitioner to determine how many Reiki sessions are needed to address specific concerns.

  • Understanding How Many Ounces In Teaspoon

    Understanding How Many Ounces In Teaspoon

    In one teaspoon, there are 0.17 ounces. Understanding the conversion between these common kitchen measurements can be a game-changer when following recipes or preparing meals. Are you constantly puzzled by the question of how many ounces are in a teaspoon? Fear not, as we unravel this mystery for you in today’s insightful blog article. Join us as we dive into the world of measurements and explore the simplicity behind this seemingly complex query. Get ready to enhance your culinary skills with this essential knowledge!

    Understanding How Many Ounces in Teaspoon

    Understanding How Many Ounces in a Teaspoon

    Welcome, young learners, to an exciting journey where we explore the fascinating world of measurements! Today, we are going to unravel the mystery of “how many ounces are in a teaspoon.” Have you ever wondered about this while helping out in the kitchen or conducting fun science experiments? Well, you’ve come to the right place to find out!

    What is a Teaspoon?

    Let’s start with the basics. A teaspoon is a common unit of measurement in the kitchen. It is used for adding just the right amount of sugar to your cereal, stirring honey into your tea, or sprinkling some salt on your popcorn. A teaspoon is smaller than a tablespoon and is perfect for measuring small quantities of ingredients.

    Exploring Ounces

    Now, let’s talk about ounces. Ounces are another unit of measurement that we often come across when following recipes or checking the weight of items. You might have heard of ounces when your parents talk about how much milk to pour into your glass or how many ounces of chocolate are needed to bake cookies.

    Converting Teaspoons to Ounces

    So, how many ounces are in a teaspoon? The answer might surprise you! In the world of measurements, there are actually 0.166667 (approximately 1/6th) ounces in one teaspoon. That means if you have six teaspoons of a substance, you would have around 1 ounce of that substance.

    Why is this Conversion Important?

    Understanding the relationship between teaspoons and ounces is crucial when following recipes accurately. Imagine if a recipe calls for 4 ounces of vanilla extract, but you only have a teaspoon to measure it out. By knowing the conversion rate, you can confidently measure out the right amount of vanilla extract needed for your recipe.

    Practical Examples

    Let’s put our newfound knowledge to the test with some fun examples. If you have a jar of honey and the label says it contains 12 ounces, how many teaspoons of honey do you think are in the jar? By applying our conversion rate of 0.166667 ounces per teaspoon, you can calculate how many teaspoons are in the jar.

    Here’s a hint: It involves a bit of division and multiplication, but don’t worry; we’ll guide you through the process step by step!

    Real-World Applications

    Understanding measurements like teaspoons and ounces can also help you in everyday situations. For instance, if you are helping your parents bake a cake and the recipe calls for 8 ounces of flour, you can confidently measure out the right amount using teaspoons or a kitchen scale.

    Moreover, knowing how to convert between different units of measurement can be helpful in school projects, science experiments, and even when sharing snacks with friends. It’s like having a superpower that allows you to measure things accurately wherever you go!

    Congratulations, young learners! You have successfully delved into the world of measurements and uncovered the mystery of how many ounces are in a teaspoon. Remember, measurements are all around us, from the ingredients in our favorite recipes to the weights of objects we use every day.

    By mastering the art of converting between teaspoons and ounces, you are one step closer to becoming a measurement expert. So, the next time you reach for a teaspoon in the kitchen or encounter ounces in a recipe, you can confidently measure and experiment like a pro!

    Keep exploring, keep learning, and most importantly, have fun on your measurement adventures!

    How Many Ounces In A Tablespoon

    Frequently Asked Questions

    How many ounces are in a teaspoon?

    A teaspoon is equal to approximately 0.17 ounces. This means that if you are measuring liquids or powders in teaspoons, each teaspoon would equate to roughly 0.17 ounces in weight.

    Can I convert teaspoons to ounces easily?

    Yes, converting teaspoons to ounces is relatively straightforward. You can simply multiply the number of teaspoons by 0.17 to get the equivalent weight in ounces. For example, if you have 5 teaspoons, it would be 5 x 0.17 = 0.85 ounces.

    Why is it important to know the conversion of teaspoons to ounces?

    Understanding the conversion of teaspoons to ounces is useful for precise measurement in cooking and baking recipes. It ensures accuracy in the amount of ingredients used, especially when dealing with small quantities that can significantly impact the final result.

    Final Thoughts

    In summary, knowing how many ounces are in a teaspoon is essential for precise cooking and baking. Remember, one teaspoon is equal to about 0.17 ounces. When following recipes, this conversion can help ensure accurate measurements. By understanding the relationship between ounces and teaspoons, you can elevate your culinary skills. Mastering how many ounces are in a teaspoon will take your cooking expertise to the next level.

  • How Many Levels Are In Stickman Hook: Ultimate Guide

    How Many Levels Are In Stickman Hook: Ultimate Guide

    Stickman Hook offers a thrilling gaming experience with a dynamic series of challenges across various levels. If you’re wondering how many levels are in Stickman Hook, the answer is simple: the game features a whopping 300 levels to keep you engaged and entertained. Each level presents a unique obstacle course that will test your reflexes and agility. As you swing, jump, and soar through each level, the excitement only grows. Get ready to conquer all 300 levels and become a Stickman Hook master!

    How many levels are in Stickman Hook: Ultimate Guide

    How Many Levels Are in Stickman Hook? Exploring the Exciting World of Stickman Adventures

    Welcome, fellow gamers and stickman enthusiasts! If you’re here, you’re probably curious about how many levels are in Stickman Hook. Well, you’ve come to the right place! Stickman Hook is a thrilling mobile game that will test your reflexes and agility as you guide the stickman through various challenging levels. Let’s dive deeper into the world of Stickman Hook and find out just how many levels await you in this addictive game.

    The Basics of Stickman Hook

    Before we jump into the number of levels in Stickman Hook, let’s first understand the basics of the game. Stickman Hook is a fast-paced, physics-based game where you control a stickman character who swings through a vibrant and colorful world filled with obstacles and challenges. Your goal is to swing from one point to another using a rope while avoiding obstacles and collecting stars along the way.

    As you progress through the levels, you’ll encounter different types of obstacles, such as spikes, rotating platforms, and moving objects, that will test your timing and reflexes. The simple and intuitive controls make Stickman Hook easy to pick up, but mastering the game and completing all the levels will require skill and precision.

    Exploring the Levels in Stickman Hook

    Now, let’s get to the exciting part – how many levels are there in Stickman Hook? The game features a wide variety of levels that will keep you entertained for hours on end. Each level presents a unique challenge and requires you to use different strategies to swing your way to victory.

    Early Levels: The Training Ground

    When you first start playing Stickman Hook, you’ll be greeted with a series of introductory levels that serve as a training ground to familiarize you with the game mechanics. These early levels are designed to help you get comfortable with swinging and navigating obstacles, setting the stage for the more challenging levels that lie ahead.

    Mid-Level Madness: The Adventure Continues

    As you progress through the game, you’ll encounter more complex levels that will put your skills to the test. From narrow passages to spinning platforms, each level brings new obstacles and challenges that will keep you on your toes. The mid-levels in Stickman Hook ramp up the difficulty, requiring precise timing and quick reflexes to swing your way to the finish line.

    Final Stretch: The Ultimate Test

    As you reach the later stages of Stickman Hook, you’ll face the most challenging levels yet. These final levels will push your skills to the limit and require a combination of strategy and precision to conquer. From tight spaces to moving obstacles, the final stretch of levels in Stickman Hook will challenge even the most seasoned players.

    Endless Fun and Replay Value

    One of the best things about Stickman Hook is its endless fun and replay value. Even after you’ve completed all the levels, you can always go back and try to beat your previous scores or compete with friends to see who can swing their way through the levels the fastest. The addictive gameplay and satisfying mechanics make Stickman Hook a game that you’ll want to keep coming back to again and again.

    So, how many levels are in Stickman Hook? While the exact number may vary depending on updates and new level additions, one thing is for sure – Stickman Hook offers a wide range of levels that will challenge and delight players of all ages. Whether you’re a casual gamer looking for some quick fun or a seasoned player seeking a new challenge, Stickman Hook has something for everyone. So, grab your rope, swing into action, and see how far you can go in the exciting world of Stickman adventures!

    Level 1000 on Stickman Hook !!!😳😳

    Frequently Asked Questions

    How many levels are there in Stickman Hook?

    Stickman Hook features a total of 100 levels for players to conquer. Each level presents a unique challenge that tests your reflexes and skills as you swing your way through the game.

    Are the levels in Stickman Hook progressively more challenging?

    Yes, the levels in Stickman Hook do increase in difficulty as you progress through the game. You will encounter new obstacles, faster speeds, and trickier maneuvers to keep the gameplay engaging and exciting.

    Are there any bonus levels or hidden stages in Stickman Hook?

    Stickman Hook does not have specific bonus levels or hidden stages beyond the main 100 levels. However, players can always strive to beat their own records, aim for higher scores, or discover new tricks to enhance their gameplay experience.

    Final Thoughts

    Stickman Hook offers a compelling gameplay experience with its fluid mechanics and challenging levels. With a total of 100 levels, players can test their skills and reflexes throughout the game. Each level presents a unique set of obstacles and requires precision to navigate successfully. Whether you’re a casual player or a hardcore gamer, the variety in level design ensures an engaging experience. So, if you’re wondering how many levels are in Stickman Hook, rest assured there are plenty to keep you entertained.

  • Guide: Make Coffee Without Electricity – Essential Tips

    Guide: Make Coffee Without Electricity – Essential Tips

    Making coffee without electricity is simpler than you may think. With just a few basic tools and techniques, you can savor the rich, aromatic brew anywhere, anytime. Whether you’re camping under the stars or facing a power outage, mastering the art of how to make coffee without electricity is a valuable skill. Ready to unlock the secrets of enjoying your favorite drink even when the power is out? Let’s dive in and discover the joys of brewing coffee the old-fashioned way.

    Guide: Make Coffee Without Electricity - Essential Tips

    How to Make Coffee Without Electricity: A Comprehensive Guide

    Welcome, coffee enthusiasts! Are you craving a delicious cup of coffee but find yourself without electricity? Worry not, as we have got you covered. In this detailed guide, we will explore various methods and techniques to brew the perfect cup of coffee even when the power is out. Whether you are camping in the wilderness, experiencing a power outage, or simply looking for a unique brewing experience, we will walk you through the steps to enjoy your favorite beverage sans electricity.

    The Necessity of Coffee in Our Lives

    Coffee is more than just a beverage; it’s a ritual, a comfort, and a source of energy for many of us. Its rich aroma and bold flavor have the power to kickstart our mornings and provide a sense of warmth and relaxation throughout the day. So, when the power goes out, and your trusty coffee maker is rendered useless, it’s essential to know alternative methods to satisfy your coffee cravings.

    Boiling Water Without Electricity

    The first step to making coffee without electricity is to boil water. While the traditional electric kettle may not be an option, fear not, as there are several ways to heat water using alternative methods:

    1. Campfire or Stove

    If you have access to a campfire or a gas stove, you can heat water in a kettle or pot as you would normally. Simply place the kettle over the flames and wait for the water to come to a rolling boil. This method provides a rustic and adventurous touch to your coffee-making experience.

    2. Solar Power

    On a sunny day, harness the power of the sun to heat water for your coffee. Fill a heat-resistant container with water and place it in direct sunlight. Over time, the sun’s rays will gradually heat the water to the desired temperature. This eco-friendly method is not only effective but also a great way to enjoy coffee outdoors.

    Alternative Coffee Brewing Methods

    Now that you have your hot water ready, let’s explore different brewing methods that do not require electricity:

    1. French Press

    The French press, also known as a press pot or plunger pot, is a classic method of brewing coffee that produces a rich and full-bodied flavor. To make coffee using a French press without electricity, follow these steps:

    1. Grind your coffee beans to a coarse consistency.
    2. Place the ground coffee at the bottom of the French press.
    3. Pour hot water over the coffee grounds and stir gently.
    4. Place the lid on the French press with the plunger pulled up and let the coffee steep for a few minutes.
    5. Slowly press the plunger down to separate the grounds from the brewed coffee.
    6. Pour the coffee into your favorite mug and enjoy!

    2. Pour-Over Method

    The pour-over method is a simple yet effective way to brew delicious coffee without electricity. All you need is a pour-over dripper, coffee filter, ground coffee, and hot water. Here’s how to make coffee using the pour-over method:

    1. Place the coffee filter in the dripper and set it over your mug or carafe.
    2. Add the ground coffee to the filter, ensuring it is evenly distributed.
    3. Slowly pour hot water over the coffee grounds in a circular motion, allowing the coffee to bloom.
    4. Continue pouring water in stages, keeping the grounds saturated.
    5. Once all the water has passed through the grounds, discard the filter and grounds, and savor your freshly brewed coffee.

    Flavorful Additions and Tips

    Enhance your coffee-making experience without electricity by experimenting with various flavor additions and techniques:

    1. Flavored Syrups

    Add a touch of sweetness and flavor to your coffee by incorporating homemade or store-bought flavored syrups. Vanilla, caramel, or hazelnut syrups can elevate the taste of your brew and add a delightful twist.

    2. Spices and Herbs

    Get creative with your coffee by infusing it with spices like cinnamon, nutmeg, or cardamom. Fresh herbs such as mint or lavender can also impart unique aromas and flavors to your cup of joe.

    3. Cold Brew Method

    If you prefer a refreshing cold coffee option, try making cold brew without electricity. Simply steep coarsely ground coffee in cold water for an extended period, strain the mixture, and enjoy a smooth and mellow cold brew coffee.

    With a little creativity and resourcefulness, you can continue to enjoy your beloved cup of coffee even when faced with a power outage or lack of electricity. By exploring alternative brewing methods and incorporating flavorful additions, you can tailor your coffee-making experience to suit your preferences and circumstances. So, the next time you find yourself without power, remember these tips and techniques to brew the perfect cup of coffee without electricity. Cheers to a satisfying and flavorful coffee experience!

    Thank you for reading. Enjoy your coffee adventure!

    how to make coffee without a coffee pot.

    Frequently Asked Questions

    How can I make coffee without electricity?

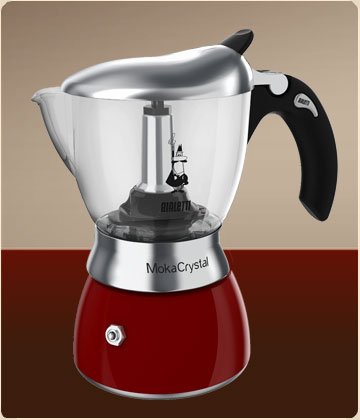
    To make coffee without electricity, you can use alternative methods such as a French press, pour-over, Aeropress, or a stovetop espresso maker. These methods allow you to brew coffee using hot water without the need for electricity.

    What are some traditional ways to make coffee without electricity?

    In traditional methods, you can brew coffee using a campfire, a gas stove, or a portable stove by heating water and then pouring it over coffee grounds in a pot or a filter. This allows you to enjoy coffee even in outdoor settings without electricity.

    Can I make cold brew coffee without electricity?

    Yes, you can make cold brew coffee without electricity by steeping coffee grounds in cold water for an extended period, usually 12-24 hours. Once the steeping is done, you can strain the coffee to enjoy a smooth and refreshing cold brew without the need for electricity.

    Final Thoughts

    In a world reliant on technology, knowing how to make coffee without electricity is a valuable skill. By utilizing methods such as the French press or pour-over technique, you can enjoy a rich cup of coffee even during power outages. Embrace the simplicity of manual brewing to savor the flavors of freshly brewed coffee anytime, anywhere. Explore alternative brewing methods for a delicious caffeine fix without relying on electricity.