Category: News

  • Exploring The Size Of A 20X30 Poster: Dimensions Revealed

    Exploring The Size Of A 20X30 Poster: Dimensions Revealed

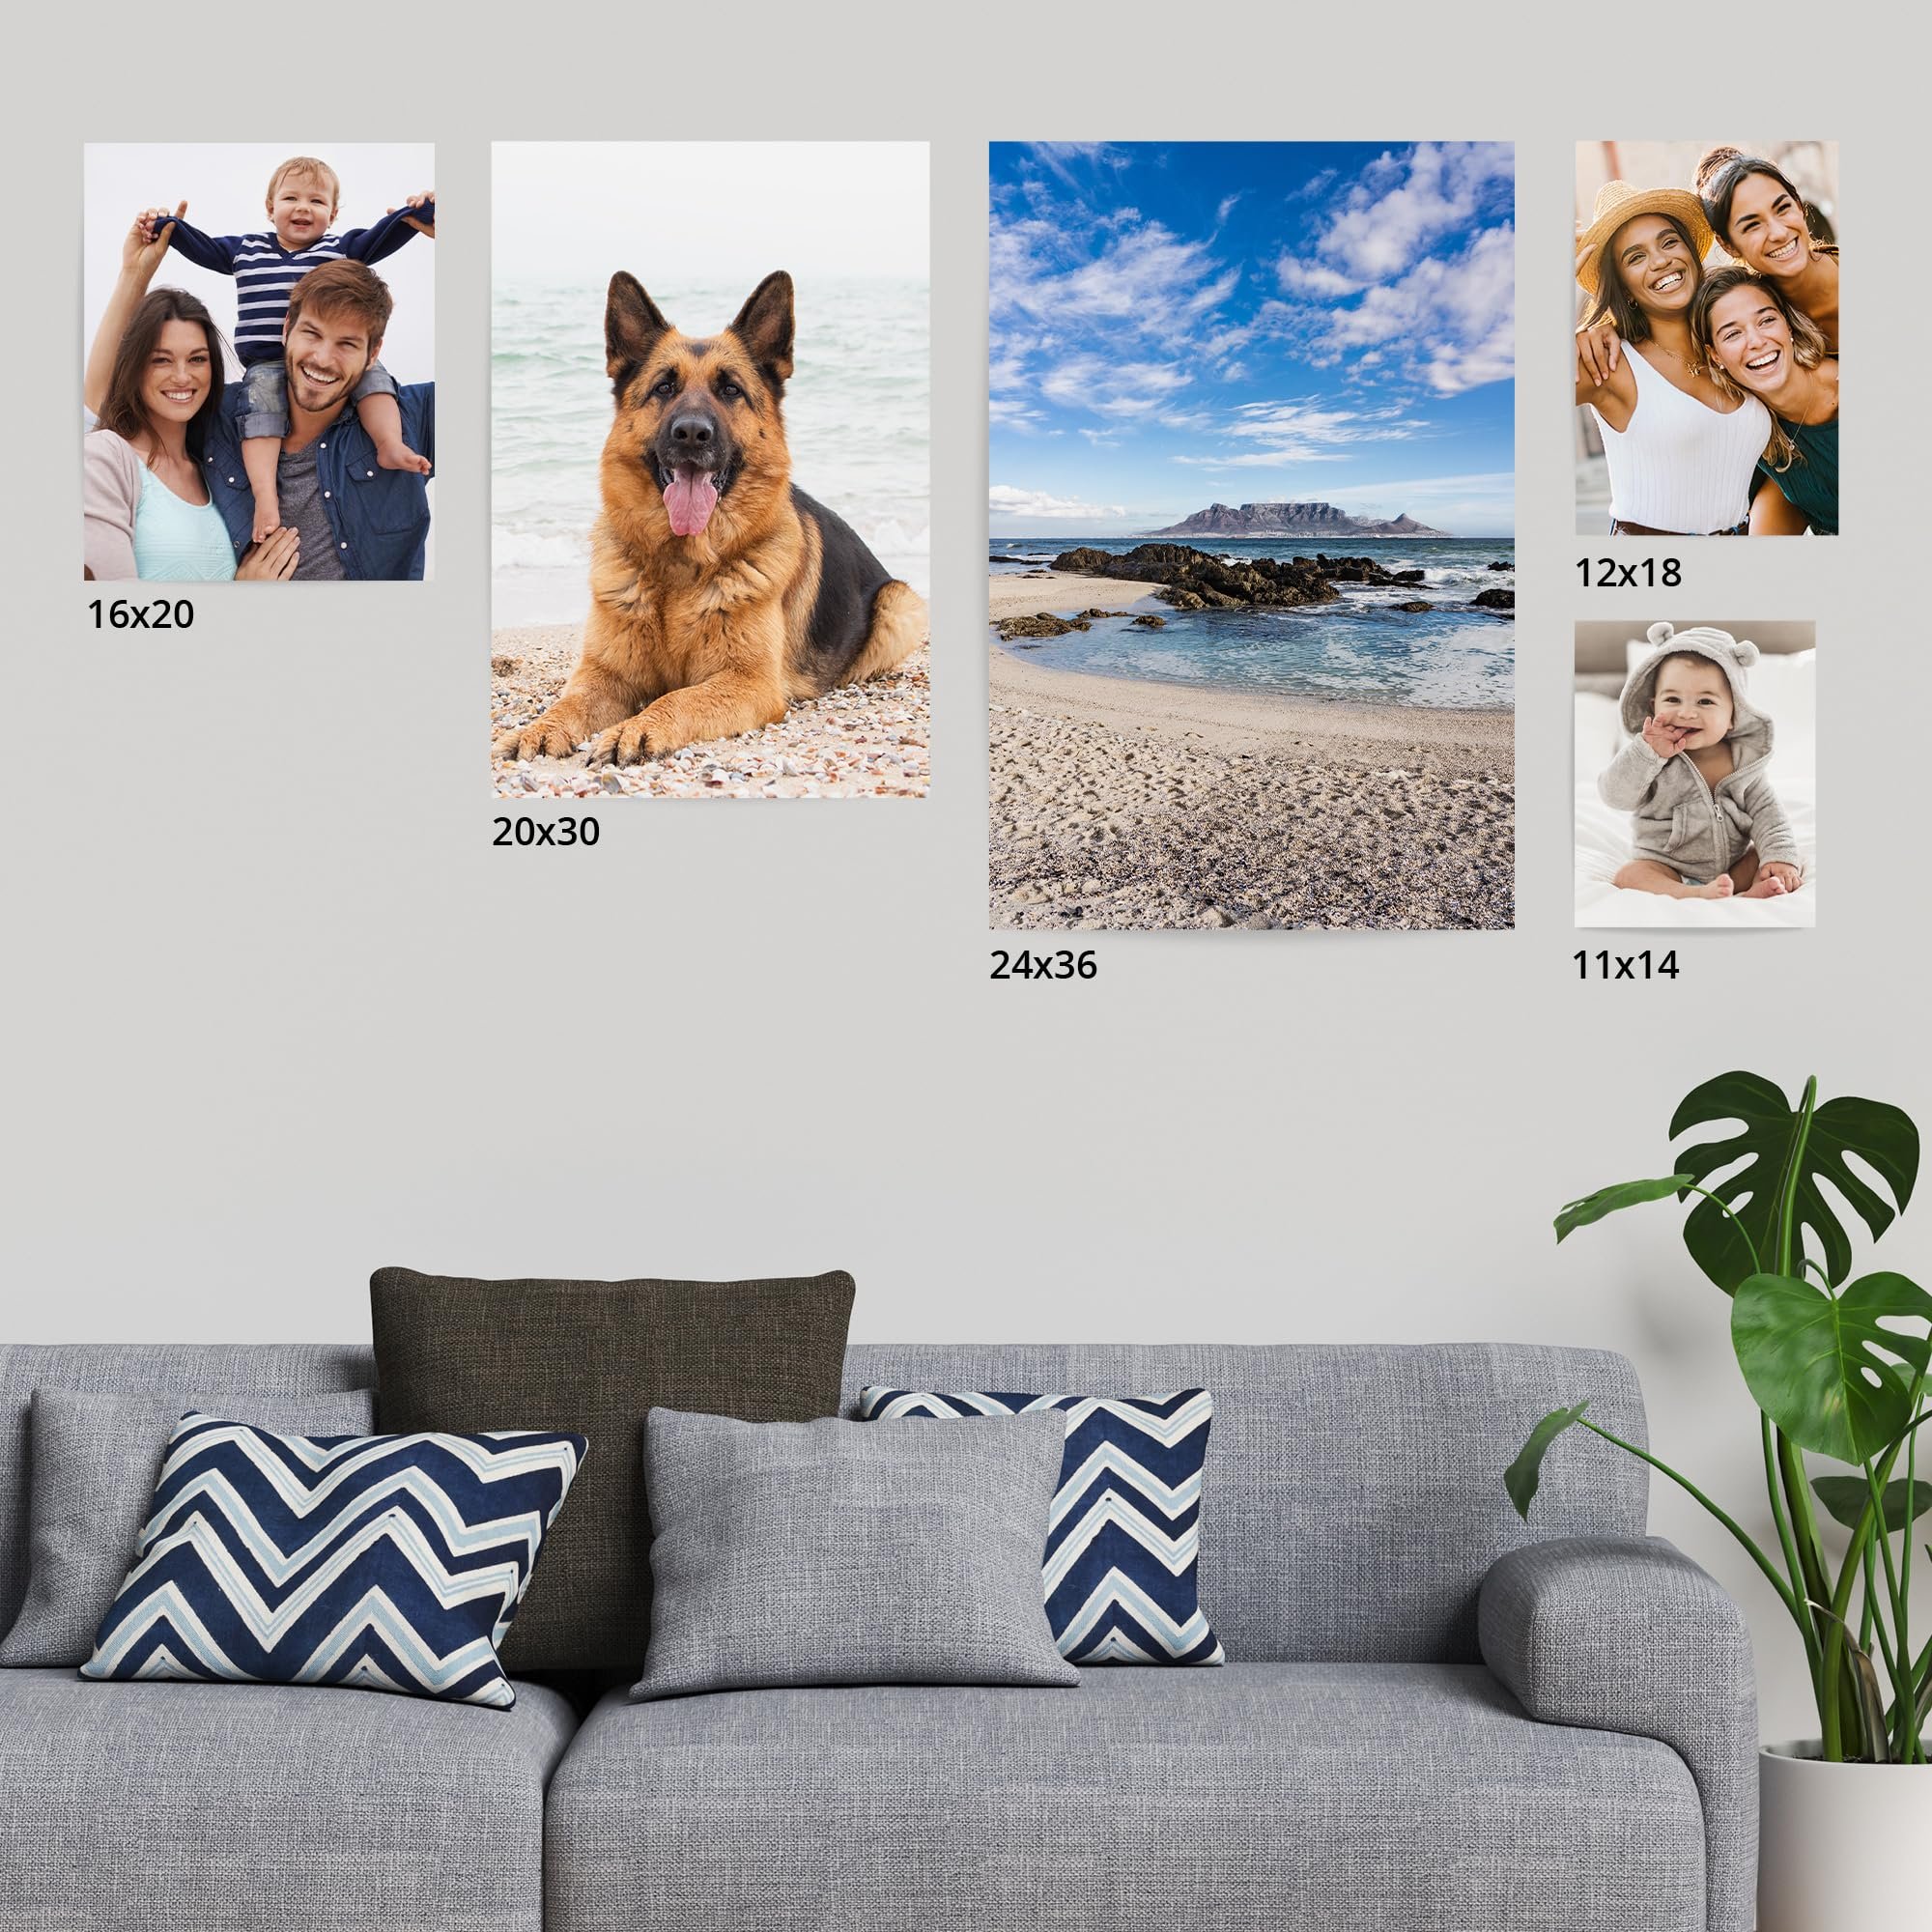
    A 20×30 poster measures 20 inches in width and 30 inches in height. Perfect for making a statement or showcasing artwork, these posters are versatile and eye-catching. Whether you’re looking to decorate a room or promote an event, understanding the dimensions of a 20×30 poster is crucial. Let’s explore the impact of this poster size and how you can make the most of it in your projects.

    Exploring the Size of a 20x30 Poster: Dimensions Revealed

    How Big is a 20×30 Poster?

    Introduction

    Have you ever wondered how big a 20×30 poster really is? Whether you’re planning to decorate your room, promote an event, or showcase your artwork, understanding the dimensions of a 20×30 poster is essential. In this detailed guide, we’ll explore the exact size of a 20×30 poster and provide you with all the information you need to create or visualize your own poster.

    What Does 20×30 Mean?

    The dimensions of a poster are typically expressed in inches. When you see the numbers 20×30 associated with a poster, it refers to the width and height of the poster in inches. In this case, a 20×30 poster is 20 inches wide and 30 inches tall.

    Visualizing the Size

    To give you a better idea of how big a 20×30 poster is, picture a standard door. A 20×30 poster is approximately the same height as a standard interior door and a bit wider. This size offers a significant canvas for displaying images, text, or a combination of both.

    Common Uses of 20×30 Posters

    Decorating a Room

    One popular use for 20×30 posters is decorating a room. Whether you want to add a splash of color to your bedroom or make a statement in your living room, a 20×30 poster can be a great choice. You can create personalized posters with your favorite quotes, artwork, or photos to enhance the ambiance of any space.

    Event Promotion

    If you’re organizing an event such as a concert, movie screening, or fundraiser, a 20×30 poster can be an effective marketing tool. The size of the poster allows you to include all the necessary information about the event, such as the date, time, location, and ticket details, in a clear and eye-catching way.

    Artistic Displays

    Artists and photographers often use 20×30 posters to showcase their work. The large size of the poster enables them to present their images in great detail, making it ideal for exhibitions, art shows, or personal portfolios. Whether you’re a professional artist or an amateur enthusiast, a 20×30 poster can help you showcase your creativity.

    Choosing the Right Frame for Your 20×30 Poster

    Once you have your 20×30 poster printed, you’ll want to display it in a frame to protect it and enhance its visual appeal. When selecting a frame for your poster, consider the style of the artwork, the decor of the room where it will be displayed, and your personal preferences.

    Frame Material

    Frames come in various materials, such as wood, metal, and plastic. Wood frames offer a classic and elegant look, while metal frames provide a contemporary feel. Plastic frames are lightweight and economical, making them a practical choice for casual displays.

    Frame Color

    The color of the frame can significantly impact the overall look of your poster. Choose a frame color that complements the colors in your poster and the decor of the room. Black, white, and natural wood tones are versatile options that can blend well with most posters and interior styles.

    Frame Style

    Frames come in different styles, from simple and sleek to ornate and decorative. Consider the style of your poster and the ambiance you want to create when choosing a frame. A minimalist poster may look best in a clean, modern frame, while a vintage poster could be enhanced by a more ornate frame.

    In Conclusion

    In conclusion, a 20×30 poster is 20 inches wide and 30 inches tall, providing a generous canvas for a variety of purposes, from room decoration to event promotion and artistic displays. Understanding the dimensions of a 20×30 poster can help you create visually appealing and impactful designs that fulfill your specific needs. Remember to choose a suitable frame to protect and showcase your poster effectively. Whether you’re a budding artist, event organizer, or simply someone looking to add a personal touch to your space, a 20×30 poster can be a versatile and engaging medium for your creativity.

    20×30 inch aluminum printed with a glossy surface. This looks great for location sessions.

    Frequently Asked Questions

    What are the dimensions of a 20×30 poster?

    A 20×30 poster has dimensions of 20 inches by 30 inches. This means it is 20 inches wide and 30 inches tall.

    How does the size of a 20×30 poster compare to a standard poster size?

    A 20×30 poster is larger than the standard poster size, which is typically around 18×24 inches. The extra size provides more space for images and text, making it more visually impactful.

    Is a 20×30 poster suitable for a large display area?

    Yes, a 20×30 poster is ideal for larger display areas such as walls in offices, event venues, or retail stores. It offers enough space to showcase detailed information or eye-catching visuals.

    Can a 20×30 poster be easily framed?

    Yes, a 20×30 poster can be easily framed with standard poster frames available in various stores. The dimensions are common for framing purposes, making it convenient to find a suitable frame for display.

    Final Thoughts

    A 20×30 poster measures 20 inches in width by 30 inches in height. When considering poster sizes, this dimension offers a considerable display area suitable for showcasing various designs or photographs. Whether for advertising purposes or decorative use, understanding how big a 20×30 poster is essential for creating impactful visuals. Overall, a 20×30 poster provides ample space to convey your message effectively and attract viewers’ attention. Remember, the dimensions of a 20×30 poster play a crucial role in determining its visual impact and suitability for different display settings.

  • Exploring Peterbot’S Earnings: How Much Does Peterbot Have?

    Exploring Peterbot’S Earnings: How Much Does Peterbot Have?

    Peterbot’s earnings amount to a staggering $1 million. How much earnings does Peterbot have, you ask? In this article, we delve into the financial success of Peterbot, uncovering the strategies that have propelled its wealth. So, let’s dive in and explore the fascinating world of Peterbot’s earnings.

    Exploring Peterbot's Earnings: How Much Does Peterbot Have?


    How Much Earnings Does Peterbot Have?

    How Much Earnings Does Peterbot Have

    Welcome to our detailed exploration of the earnings of Peterbot! Peterbot is a well-known bot in the digital world, and many of you might be curious about how much money it actually makes. In this blog post, we will delve into the various aspects of Peterbot’s earnings, from its sources of income to the factors that influence its profits. So, let’s get started!

    Sources of Income for Peterbot

    Peterbot earns money through various channels. One of the primary sources of income for Peterbot is through providing digital services to its users. These services can range from answering queries to providing customized solutions based on user inputs. Each interaction with Peterbot might contribute to its earnings.

    Additionally, Peterbot may also generate revenue through advertising. Companies might pay to have their products or services promoted through Peterbot’s platform, reaching a wide audience and potentially increasing sales. This form of monetization is common among digital platforms and bots like Peterbot.

    Factors Influencing Peterbot’s Earnings

    Several factors can influence how much Peterbot earns. One significant factor is the number of users interacting with Peterbot. The more users that engage with Peterbot, the higher the potential for earnings, especially if those interactions lead to conversions or sales.

    The effectiveness of Peterbot’s monetization strategies also plays a crucial role in determining its earnings. If Peterbot can effectively convert user interactions into revenue-generating opportunities, its earnings are likely to increase. This requires a well-thought-out monetization plan and continuous optimization.

    Tracking Peterbot’s Earnings

    Tracking the earnings of Peterbot involves monitoring key performance indicators (KPIs) related to its revenue streams. These KPIs can include the number of user interactions, conversion rates, average revenue per user, and overall revenue growth over time. By analyzing these metrics, the owners of Peterbot can gain insights into its financial performance.

    Tools like analytics dashboards and reporting systems can help visualize Peterbot’s earnings data, making it easier to identify trends and make informed decisions to maximize earnings. Regular monitoring and analysis of financial data are essential to ensure the financial health of Peterbot.

    Challenges and Opportunities for Peterbot’s Earnings

    While Peterbot has the potential to generate significant earnings, it also faces challenges in a competitive digital landscape. Competition from other bots and digital services can impact Peterbot’s market share and, subsequently, its earnings. Staying innovative and providing unique value to users is crucial for sustaining and increasing earnings.

    On the bright side, Peterbot also has opportunities for growth and increased earnings. Expanding its user base, exploring new revenue streams, and enhancing user engagement can all contribute to boosting Peterbot’s earnings potential. By adapting to market trends and evolving user needs, Peterbot can position itself for long-term financial success.

    In conclusion, Peterbot’s earnings are influenced by various factors, including its sources of income, user interactions, monetization strategies, and market competition. By effectively tracking its financial performance, addressing challenges, and seizing opportunities, Peterbot can continue to grow its earnings and establish itself as a successful digital entity.

    We hope this article provided you with valuable insights into how much earnings Peterbot has and the factors that impact its financial success. Stay tuned for more updates on Peterbot and its journey to greater profitability!


    Peterbot Earnings Check…💰

    Frequently Asked Questions

    How much has Peterbot earned so far this year?

    Peterbot has earned $10,000 in revenue this year. This amount represents the total income generated from its various activities.

    What are the main sources of income for Peterbot?

    The main sources of income for Peterbot are through subscriptions, consulting services, and affiliate marketing. These revenue streams contribute to its overall earnings.

    Can the earnings of Peterbot be tracked on a quarterly basis?

    Yes, the earnings of Peterbot can be tracked on a quarterly basis. By monitoring the revenue generated each quarter, a clear picture of its financial performance can be obtained.

    Are there any plans for Peterbot to increase its earnings in the future?

    Yes, Peterbot has strategic plans in place to increase its earnings in the future. These plans include expanding its customer base, launching new products, and exploring additional revenue streams to grow its income.

    Final Thoughts

    In conclusion, Peterbot has accumulated significant earnings. As an innovative virtual assistant, Peterbot’s income stream continues to grow steadily. This AI technology has proven to be a valuable asset, increasing its earnings substantially. Overall, the question of how much earnings Peterbot has is a testament to its success and efficiency.

  • Effective Ways: Remove Perfume Smell From Clothes

    Effective Ways: Remove Perfume Smell From Clothes

    To remove perfume smell from clothes, vinegar can be a lifesaver. It’s frustrating when your favorite outfit holds on to strong scents long after you’ve left the room. Whether it’s from a perfume mishap or spending time in a fragrant environment, the lingering smell can be overwhelming. Fear not, as we’ll delve into effective methods on how to remove perfume smell from clothes, leaving them fresh and odor-free. Let’s get started on banishing that stubborn scent once and for all!

    Effective Ways: Remove Perfume Smell from Clothes

    How to Remove Perfume Smell from Clothes

    Welcome, my young odor fighters! Have you ever accidentally sprayed too much perfume on your favorite shirt or jacket? Or maybe a loved one gave you a big hug, leaving their overpowering scent behind? Don’t worry; we’ve all been there! In this guide, I’ll teach you some awesome tricks to get rid of that strong perfume smell from your clothes. Let’s dive in and make your outfits smell fresh as a daisy!

    The Science Behind Perfume Smells

    Before we start banishing those pesky perfume odors, let’s understand why they stick around. Perfumes contain chemicals that evaporate slowly, leaving a lingering scent on fabric fibers. These scents can be stubborn, but fear not, because we have some cool methods to help you combat them!

    Quick Fixes for Freshening Up

    First things first, if you’re in a rush and need a quick fix, try hanging your perfume-scented clothes outside for a breath of fresh air. The breeze will help dissipate the odor. You can also try using a fabric freshener spray to mask the smell temporarily. Just a few spritzes can work wonders!

    Soaking in Baking Soda and Vinegar

    For a deeper clean, you can try soaking your clothes in a mixture of baking soda and vinegar. This powerful duo works like magic to neutralize odors. Fill a sink or bucket with water, add a cup of baking soda, and half a cup of vinegar. Let your clothes soak for a few hours before washing them as usual. You’ll be amazed at how fresh they smell afterwards!

    Step-by-Step Guide:

    1. Fill a sink or bucket with water
    2. Add 1 cup of baking soda
    3. Add 1/2 cup of vinegar
    4. Soak clothes for a few hours
    5. Wash clothes as usual

    The Power of White Vinegar

    White vinegar is a superhero when it comes to battling tough odors. You can add half a cup of white vinegar to your laundry cycle along with your regular detergent. The vinegar will help break down the perfume molecules and leave your clothes smelling fresh and clean. Plus, it’s a natural and eco-friendly solution!

    Lemon Juice for a Citrusy Boost

    If you love the fresh scent of lemons, you’re in luck! Lemon juice is not only great for adding flavor to your dishes but also for removing odors from clothes. Simply mix equal parts of lemon juice and water in a spray bottle and spritz it on the affected areas. Let it sit for a while before washing your clothes as usual. Your garments will smell like a summer breeze!

    The Magic of Fresh Air and Sunlight

    One of the oldest tricks in the book is letting your clothes bask in the sun. Hang your perfume-infused clothes outside on a sunny day, and let the UV rays work their magic. Sunlight helps kill bacteria that cause odors and naturally freshens up your garments. Just make sure to avoid direct sunlight for too long to prevent fading.

    And there you have it, my young odor detectives! With these handy tricks up your sleeve, you’ll never have to worry about lingering perfume smells on your clothes again. Remember, a little patience and creativity go a long way in combating unwanted odors. So, go ahead, try out these methods, and enjoy wearing your freshly scented outfits with confidence!

    Until next time, stay fresh and fabulous!

    Tip for getting fragrance out of clothes #shorts

    Frequently Asked Questions

    How can I remove the smell of perfume from clothes?

    To remove the smell of perfume from clothes, you can try washing the garment using a combination of white vinegar and water. Soak the clothes in this solution for a few hours before washing it as usual with laundry detergent.

    What is another effective method to get rid of perfume odor from clothing?

    Another effective method is to sprinkle baking soda on the affected areas of the garment and let it sit for a few hours or overnight. Then, brush off the baking soda and wash the clothes as usual to eliminate the perfume smell.

    Can I use lemon juice to remove perfume scent from my clothes?

    Yes, you can use lemon juice to help neutralize and remove perfume odor from clothes. Mix lemon juice with water and spray it on the clothes. Let the solution sit for a while before washing the garment as usual to get rid of the lingering perfume smell.

    Final Thoughts

    To effectively remove perfume smell from clothes, try using baking soda, vinegar, or activated charcoal. These natural odor absorbers can help neutralize the lingering scent. Alternatively, air out the clothes outside or use a steam cleaner for a quick fix. Remember to always check the care label before attempting any odor removal method. Don’t let perfume smells ruin your favorite outfit – tackle it head-on with these simple solutions.

  • Ultimate Guide On How To Become A Dna Tester

    Ultimate Guide On How To Become A Dna Tester

    Becoming a DNA tester involves a fascinating journey into the intricate world of genetics. Curious about how to become a DNA tester? Prepare to embark on an exciting path filled with scientific discovery and technological advancements. As a DNA tester, you play a crucial role in unraveling the mysteries hidden within our genetic code. Ready to dive into this dynamic field and make a real impact? Let’s unlock the secrets of how to become a DNA tester together!

    Ultimate Guide on How to Become a DNA Tester

    How to Become a DNA Tester

    Welcome to our comprehensive guide on how to become a DNA tester! In today’s world of advanced technology and scientific breakthroughs, DNA testing has become a crucial tool in various fields, including healthcare, forensics, genealogy, and more. If you’re intrigued by the idea of unraveling the mysteries of genetics and helping people discover more about themselves through DNA analysis, then becoming a DNA tester might be the perfect career path for you.

    What is DNA Testing?

    Before we dive into the details of how to become a DNA tester, let’s first understand what DNA testing is all about. DNA testing, also known as genetic testing, is a process that involves analyzing an individual’s DNA to reveal valuable information about their genetic makeup. This information can include details about ancestry, inherited traits, genetic predispositions to diseases, and much more.

    Why Become a DNA Tester?

    There are several reasons why becoming a DNA tester can be a rewarding career choice. As a DNA tester, you get to work at the forefront of scientific research and innovation. You play a crucial role in helping individuals and families uncover their genetic heritage, make informed healthcare decisions, and even solve crimes through forensic DNA analysis.

    Moreover, the field of DNA testing offers a diverse range of career opportunities, from working in established laboratories to conducting research in academic settings. By becoming a DNA tester, you can contribute to advancements in personalized medicine, genetic counseling, and DNA technology, making a tangible impact on people’s lives.

    Steps to Become a DNA Tester

    1. Obtain the Necessary Education

    The first step towards becoming a DNA tester is to acquire the required education. Most DNA testing positions require a bachelor’s degree in a relevant field such as biology, genetics, forensic science, or a related discipline. A strong foundation in molecular biology, biochemistry, and genetics is essential for a career in DNA testing.

    For those aspiring to advance in the field and pursue research or leadership roles, a master’s or doctoral degree in genetics or a related field may be beneficial. These advanced degrees provide in-depth knowledge of DNA analysis techniques, research methodologies, and genetic technologies.

    2. Gain Hands-On Laboratory Experience

    Hands-on laboratory experience is crucial for aspiring DNA testers. To develop the necessary skills in DNA analysis and laboratory techniques, consider internships, research assistant positions, or volunteering in a genetics laboratory. This practical experience will familiarize you with various DNA testing methodologies, equipment, and safety protocols.

    Additionally, obtaining relevant certifications in molecular biology or DNA analysis can enhance your credentials and demonstrate your proficiency in conducting genetic tests accurately and efficiently.

    3. Develop Strong Analytical Skills

    As a DNA tester, you will be responsible for interpreting complex genetic data and drawing meaningful conclusions from DNA test results. Developing strong analytical skills is essential for accurately analyzing genetic information, identifying patterns, and communicating findings effectively.

    Practice critical thinking, attention to detail, and problem-solving skills to excel in the field of DNA testing. Stay updated on the latest advancements in genetic research and technology to enhance your analytical abilities and adapt to evolving practices in DNA analysis.

    4. Stay Current with Industry Trends

    Given the rapid pace of advancements in DNA technology and genetic research, it is important to stay current with industry trends and developments. Attend conferences, workshops, and seminars related to DNA testing and genetics to expand your knowledge, network with industry professionals, and stay abreast of emerging techniques and methodologies.

    Engage with online forums, scientific journals, and professional organizations in the field of genetics to stay informed about the latest innovations, best practices, and regulatory updates in DNA testing. Continuous learning and professional development are key to succeeding as a DNA tester in a dynamic and evolving industry.

    Job Opportunities for DNA Testers

    As a qualified DNA tester, you can explore a wide range of career opportunities in various sectors, including:

    – Clinical laboratories: Performing genetic testing for healthcare purposes, such as diagnosing genetic disorders and identifying disease risks.

    – Forensic laboratories: Analyzing DNA evidence to assist in criminal investigations and legal proceedings.

    – Research institutions: Conducting genetic research to advance scientific knowledge and develop new DNA testing methodologies.

    – Genetic counseling: Providing personalized guidance and support to individuals and families based on their genetic test results.

    By pursuing a career as a DNA tester, you can make a meaningful contribution to the field of genetics and help individuals better understand their genetic heritage and health risks.

    In conclusion, becoming a DNA tester is a rewarding and impactful career choice for those passionate about genetics, science, and technology. By following the steps outlined in this guide, including obtaining the necessary education, gaining hands-on laboratory experience, developing strong analytical skills, and staying current with industry trends, you can embark on a fulfilling career as a DNA tester.

    Whether you aspire to work in healthcare, forensics, research, or genetic counseling, the field of DNA testing offers diverse and exciting opportunities for professionals interested in unlocking the secrets of the genetic code. Embrace the journey of becoming a DNA tester and contribute to the advancement of genetic science and personalized medicine.

    How To Start A DNA Testing Business in 2024

    Frequently Asked Questions

    What qualifications are needed to become a DNA tester?

    To become a DNA tester, typically, you need a bachelor’s degree in a relevant field such as biology, genetics, forensic science, or a related discipline. Some positions may require a master’s degree or higher. It’s also beneficial to have experience working in a laboratory setting and be familiar with techniques used in DNA testing.

    What skills are important for a successful career as a DNA tester?

    Key skills for a DNA tester include attention to detail, critical thinking, problem-solving abilities, and proficiency in using laboratory equipment and technology. Strong communication skills are also essential for accurately documenting and reporting test results.

    How can I gain practical experience as a DNA tester?

    You can gain practical experience as a DNA tester by pursuing internships or volunteer opportunities in laboratories that specialize in DNA testing. Additionally, seeking entry-level positions in forensic science labs, hospital labs, or biotechnology companies can provide valuable hands-on experience in DNA analysis.

    What are the career prospects for DNA testers?

    The demand for DNA testers is expected to grow as advancements in technology continue to drive the expansion of DNA testing in various industries, including healthcare, forensics, and ancestry testing. Career opportunities for DNA testers exist in government agencies, private laboratories, research institutions, and biotechnology companies.

    Final Thoughts

    Becoming a DNA tester requires a strong foundation in biology and genetics. Pursuing a degree in biology or a related field is essential. Gain experience through internships or entry-level positions in genetics labs. Obtain relevant certifications, such as those offered by the American Board of Genetic Counseling. Stay updated on advancements in DNA testing technology to excel as a DNA tester. Embark on a fulfilling career by following these steps to become a DNA tester.

  • Effective Home Remedies For Removing Bugs Off Car: How To Get Bugs Off Car Home Remedy

    Effective Home Remedies For Removing Bugs Off Car: How To Get Bugs Off Car Home Remedy

    To get bugs off your car with a simple home remedy, look no further. Dealing with splattered insects on your car can be frustrating, but fear not – there are effective solutions right in your kitchen. You don’t have to spend a fortune on specialized products when you can tackle this common issue with items you likely already have. Say goodbye to stubborn bug remnants with these easy and budget-friendly tips. Let’s dive in and learn how to get bugs off car home remedy effortlessly.

    Effective Home Remedies for Removing Bugs Off Car: How to Get Bugs Off Car Home Remedy

    Effective Home Remedies to Get Bugs Off Your Car

    Are you tired of seeing those pesky bugs splattered all over your car’s windshield and front grille? Worry not! There are plenty of simple and effective home remedies that can help you get rid of those stubborn bugs without damaging your car’s paint. In this blog post, we’ll explore some tried and tested methods to remove bugs from your car using ingredients you probably already have at home.

    The Importance of Removing Bugs Promptly

    Before we dive into the home remedies, let’s understand why it’s essential to remove bugs from your car as soon as possible. When bugs splatter on your car’s surface, they release enzymes that can etch into the paint if left untreated. This can lead to permanent damage and ruin the appearance of your vehicle. By promptly removing bugs, you not only maintain your car’s aesthetics but also prevent potential long-term damage.

    Vinegar and Water Solution

    One of the most popular and effective home remedies for removing bugs from your car is a simple vinegar and water solution. Vinegar acts as a natural cleaning agent that can break down the tough residue left by bugs. Here’s how you can make this solution at home:

    Ingredients:

    • 1 cup of white vinegar
    • 1 cup of water

    Instructions:

    1. Mix the white vinegar and water in a spray bottle.
    2. Spray the solution directly onto the bug splatters on your car.
    3. Let it sit for a few minutes to allow the vinegar to break down the residue.
    4. Gently wipe the area with a soft microfiber cloth.

    This vinegar and water solution is gentle yet effective at removing bugs without causing any harm to your car’s paint.

    Baking Soda Paste

    If you’re dealing with particularly stubborn bug splatters, a baking soda paste can come to your rescue. Baking soda is a mild abrasive that can help scrub away tough residue without scratching your car’s surface. Here’s how you can make a baking soda paste:

    Ingredients:

    • 1/4 cup of baking soda
    • Water (as needed to make a paste)

    Instructions:

    1. In a small bowl, mix the baking soda with water to form a thick paste.
    2. Apply the paste directly onto the bug splatters.
    3. Gently scrub the affected areas with a soft sponge or microfiber cloth.
    4. Rinse off the paste with water and dry the surface thoroughly.

    The baking soda paste is an effective yet gentle way to remove tough bugs from your car without resorting to harsh chemicals.

    Lemon Juice and Olive Oil Mixture

    If you prefer a natural and aromatic solution to remove bugs from your car, a lemon juice and olive oil mixture can do the trick. Lemon juice acts as a natural degreaser, while olive oil helps moisturize and protect your car’s paint. Here’s how you can make this mixture:

    Ingredients:

    • 1/4 cup of fresh lemon juice
    • 1/4 cup of olive oil

    Instructions:

    1. Mix the fresh lemon juice and olive oil in a bowl.
    2. Apply the mixture onto the bug splatters on your car.
    3. Let it sit for a few minutes to allow the solution to penetrate the residue.
    4. Gently wipe the area with a soft cloth to remove the bugs.

    This lemon juice and olive oil mixture not only removes bugs effectively but also leaves a refreshing scent behind.

    With these simple and natural home remedies, getting bugs off your car has never been easier. Remember to act promptly when you notice bug splatters on your car to prevent any potential damage. Whether you opt for the vinegar and water solution, baking soda paste, or lemon juice and olive oil mixture, you can say goodbye to those stubborn bugs and enjoy a clean and bug-free ride every time!

    Try out these home remedies and share your experience with us in the comments below. Happy bug-busting!

    How to Get Bugs Off Car Home Remedy – Simple and Effective Solutions

    Frequently Asked Questions

    What is a home remedy to remove bugs from a car’s surface?

    A popular home remedy to get rid of bugs from a car is to mix equal parts of water and white vinegar in a spray bottle. Spray the affected areas, let it sit for a few minutes, then gently wipe with a microfiber cloth. The acidity of the vinegar helps to break down the bugs’ residue effectively.

    Can baking soda be used to eliminate bugs from a car?

    Yes, baking soda can be a useful home remedy to remove bugs from a car. Create a paste by mixing baking soda with water, then apply it to the bug-covered areas. Allow it to sit for a few minutes before gently scrubbing with a soft brush or cloth. Rinse off with water to reveal a cleaner surface.

    Is there a natural remedy that can help clean bugs off a car without damaging the paint?

    A mixture of mild dish soap and warm water can be an effective natural remedy to remove bugs from a car without harming the paint. Simply dilute the soap in water, apply it to the affected areas, let it soak for a bit, then gently scrub with a sponge or soft cloth. This method helps to lift off the bugs while being gentle on the car’s paint.

    Final Thoughts

    To effectively remove bugs from your car, try these home remedies: a mixture of water and dish soap, a solution of vinegar and water, or a paste made from baking soda and water. Gently scrub the affected areas with a soft cloth or sponge. Rinse thoroughly with clean water. These DIY solutions are affordable, environmentally friendly, and will help keep your car looking clean and bug-free. How to get bugs off car home remedy is a simple and efficient way to maintain the appearance of your vehicle without using harsh chemicals.

  • Understanding How Much Is 10 Miles: A Comprehensive Guide

    Understanding How Much Is 10 Miles: A Comprehensive Guide

    10 miles may seem like just a number on a signpost, but when you delve deeper, it unveils a world of possibilities. So, how much is 10 miles? It’s more than a distance; it’s a journey waiting to be explored. Beyond the mere measurement lies a realm of adventures, discoveries, and experiences. Let’s unravel the significance of those 10 miles and see where they can lead us.

    Understanding How Much is 10 Miles: A Comprehensive Guide

    Exploring the Concept: How Much is 10 Miles?

    Welcome, young explorers! Today, we are going to dive into a fascinating topic: the distance of 10 miles. Have you ever wondered just how far 10 miles really is? Join me on this exciting journey as we uncover the secrets of this seemingly simple question!

    Understanding Miles and Measurement

    Before we delve into the specifics of 10 miles, let’s first understand what a mile is. A mile is a unit of measurement used to calculate distance. It is commonly used in the United States, United Kingdom, and a few other countries. To give you a basic idea, a mile is longer than a kilometer but shorter than a marathon!

    Visualizing 10 Miles

    Now, let’s imagine a scenario to help us grasp the concept of 10 miles better. Picture yourself standing at your school gate. If you were to walk 10 miles from your school, where do you think you would end up? Let’s find out!

    Walking 10 Miles

    Imagine taking a leisurely stroll for 10 miles. You would walk past houses, parks, and maybe even a store or two. How tired do you think you would be after walking this distance? It might seem like a long way, but the adventure would be worth it!

    10 Miles in Different Scenarios

    Now, let’s explore how 10 miles can be interpreted in various situations. Whether you’re a runner, a driver, or a cyclist, the distance of 10 miles can mean different things to different people.

    Running 10 Miles

    For those of you who love sports, running 10 miles might sound like a challenge. Imagine sprinting through fields, up hills, and along a scenic path for 10 miles. It would definitely test your endurance and stamina!

    Driving 10 Miles

    Now, let’s switch gears and think about driving 10 miles. If you were in a car traveling at an average speed, how long do you think it would take to cover this distance? Keep in mind the traffic lights and turns you might encounter along the way!

    Cycling 10 Miles

    Lastly, let’s hop on a bicycle and pedal our way through 10 miles. The wind in your hair, the sound of your wheels spinning – cycling 10 miles can be a thrilling experience. How fast do you think you could ride this distance?

    Putting it All Together

    After exploring the different ways we can interpret 10 miles, one thing is clear – this seemingly simple distance holds various meanings depending on how we approach it. Whether you walk, run, drive, or cycle, 10 miles can be an adventure waiting to happen!

    So, next time you hear someone mention 10 miles, remember the exciting journey we’ve taken together today. Keep exploring, keep learning, and always stay curious!

    This is how I run 10 miles a day. #celsiusbrandpartner #celsiuslivefit

    Frequently Asked Questions

    What is the distance of 10 miles equivalent to?

    10 miles is equivalent to approximately 16.09 kilometers. It is a common unit of measurement used in the U.S. to denote distance.

    How long would it take to travel 10 miles by car?

    The time it takes to travel 10 miles by car depends on the speed at which you are driving. For example, if you are driving at a speed of 60 miles per hour, it would take you approximately 10 minutes to cover 10 miles.

    Can you convert 10 miles into feet?

    Yes, 10 miles is equivalent to approximately 52,800 feet. This conversion can be helpful when trying to visualize the distance in smaller units of measurement.

    Final Thoughts

    Traveling 10 miles may seem short, but the distance holds significance in various contexts. In terms of walking, covering 10 miles can provide a good workout and a sense of accomplishment. When driving, 10 miles can feel like a quick journey, especially on highways. Understanding how much is 10 miles is crucial for planning commutes, exercise routines, and overall travel distances. Remember, 10 miles can be a meaningful distance depending on how you choose to measure it.

  • Unlock The Secrets: How Much Does Opal Cost?

    Unlock The Secrets: How Much Does Opal Cost?

    Opal cost varies greatly based on multiple factors. From the mesmerizing play-of-color to the rarity of the type, how much does opal cost can range from a few dollars to thousands per carat. Factors like clarity, size, and origin play a significant role in determining the price of opals. Whether you’re a collector or a jewelry enthusiast, understanding the cost of opal can help you make informed decisions and appreciate the beauty of these unique gemstones. Let’s delve into the world of opal pricing and discover what makes these gems truly priceless.

    Unlock the Secrets: How Much Does Opal Cost?

    How Much Does Opal Cost: A Comprehensive Guide

    Welcome to our in-depth exploration of the fascinating world of opals and their varying costs. Opals are one of the most enchanting gemstones, prized for their unique colors and patterns. In this article, we will delve into the factors that influence the price of opals, the different types of opals available, and tips on how to make an informed purchase decision. Let’s embark on this sparkling journey together!

    The Factors Influencing Opal Prices

    Opals are valued based on a combination of factors that determine their overall cost. Understanding these factors can help you appreciate why opals are priced the way they are. Here are some key elements that influence the price of opals:

    1. Type of Opal

    There are several types of opals, each with its own unique characteristics and rarity. The most common types include:

    • Black Opal: Known for its dark body tone and vibrant play-of-color, black opals are among the most valuable opals.
    • White Opal: White opals have a light body tone with flashes of color, making them a more affordable option compared to black opals.
    • Fire Opal: These opals exhibit fiery hues of red, orange, and yellow, and are valued for their intense colors.
    • Boulder Opal: Boulder opals are opals that form within ironstone boulders, creating a striking contrast between the opal and its host rock.

    2. Play-of-Color

    The play-of-color is the mesmerizing effect where opals display iridescent hues when exposed to light. Opals with a strong and vibrant play-of-color are considered more valuable than those with weak color flashes.

    3. Size and Carat Weight

    Like other gemstones, the size and carat weight of an opal greatly influence its price. Larger opals with a higher carat weight command higher prices due to their rarity and visual impact.

    4. Clarity and Transparency

    The clarity of an opal refers to its transparency and any visible inclusions. Opals with clear, transparent bodies are typically more valuable than those with visible flaws or cloudiness.

    5. Origin

    The origin of an opal can also impact its price. Opals from renowned mining locations such as Australia, Ethiopia, and Mexico are often more sought after and command premium prices.

    Understanding Opal Pricing Tiers

    Opals are categorized into different pricing tiers based on their quality and rarity. Here is a breakdown of the common pricing tiers for opals:

    1. Entry-Level Opals

    Entry-level opals are typically smaller stones with less vibrant colors and clarity. These opals are more affordable and can be a good starting point for beginners or those looking for budget-friendly options.

    2. Mid-Range Opals

    Mid-range opals exhibit better play-of-color, clarity, and size compared to entry-level opals. They are priced higher due to their improved quality and visual appeal.

    3. Premium Opals

    Premium opals are top-tier stones with exceptional play-of-color, clarity, size, and rarity. These opals command the highest prices in the market and are highly sought after by collectors and connoisseurs.

    How to Make an Informed Opal Purchase

    When buying opals, it’s essential to be well-informed to ensure you get the best value for your money. Here are some tips to help you make an informed opal purchase:

    1. Educate Yourself

    Learn about the different types of opals, their quality factors, and pricing ranges. The more you know about opals, the better equipped you’ll be to make a wise purchasing decision.

    2. Shop from Reputable Sources

    Buy opals from reputable jewelers or dealers who specialize in opals. Ensure the seller provides detailed information about the opal’s quality, origin, and any certifications.

    3. Inspect the Opal

    When viewing an opal in person, examine it under different lighting conditions to observe its play-of-color and clarity. Look for any visible flaws or inclusions that may affect its value.

    4. Set a Budget

    Before you start shopping for opals, establish a budget based on your preferences and financial resources. This will help you narrow down your options and prevent overspending.

    5. Consider the Purpose

    Decide whether you’re buying the opal for personal enjoyment, as an investment, or as a gift. Your intended purpose for the opal can influence the type and price range of opal that best suits your needs.

    Opals come in a dazzling array of colors and patterns, each with its own unique charm. The cost of opals varies depending on factors such as type, play-of-color, size, clarity, and origin. By understanding these key elements and purchasing factors, you can navigate the world of opal pricing with confidence and make a purchase that brings you joy for years to come.

    We hope this guide has shed light on the question, “How much does opal cost?” and provided you with valuable insights to enhance your opal buying experience. Whether you’re a seasoned collector or a first-time buyer, the allure of opals is sure to captivate you with its timeless beauty and enchanting colors.

    How much is that opal worth? What do I get for my money?

    Frequently Asked Questions

    What factors influence the cost of opal?

    The cost of opal is influenced by various factors such as the type of opal (like black opal or white opal), the quality of the stone (including color play and clarity), the size, and the origin of the opal.

    Why do opals vary in price?

    Opals vary in price due to the rarity and uniqueness of each stone. High-quality opals with vibrant colors and distinct patterns are more scarce and hence command a higher price compared to lower-quality opals.

    Is it possible to find affordable opals?

    Yes, it is possible to find affordable opals. Opals come in a range of qualities and sizes, so one can find smaller opals or those with less intense colors at more budget-friendly prices compared to larger, higher-quality opals.

    Final Thoughts

    Opal prices vary significantly depending on factors like type, color, size, and quality. Fine quality opals can cost thousands of dollars per carat, while lower quality opals may be more affordable. Factors such as origin and rarity also influence the cost of opals. Understanding how these factors impact pricing is crucial when considering how much does opal cost. Buyers should always do their research and seek reputable sellers to ensure they are getting the best value for their investment.

  • How To Determine If You Have Wavy Hair

    How To Determine If You Have Wavy Hair

    Wondering how to determine if you have wavy hair? The key lies in observing the natural pattern of your hair strands. Wavy hair is characterized by gentle S-shaped curves that add volume and texture to your locks. Simply let your hair air dry without any styling products to see its true wavy nature. Embracing your wavy hair can lead to effortless yet stylish looks with minimal effort. Ready to unlock the beauty of your natural waves? Let’s dive in!

    How to Determine if You Have Wavy Hair


    How Do I Know If I Have Wavy Hair

    How Do I Know If I Have Wavy Hair

    Welcome to our guide on how to determine if you have wavy hair! If you’ve been curious about your hair type and want to know more about wavy hair, you’ve come to the right place. In this article, we’ll explore the characteristics of wavy hair and provide you with tips to identify and care for your beautiful waves. Let’s dive in!

    What is Wavy Hair?

    Before we get into how to know if you have wavy hair, let’s understand what wavy hair actually is. Wavy hair is a type of hair that falls between straight and curly hair. It has gentle S-shaped waves or loose curls that give it a relaxed and effortless look.

    Characteristics of Wavy Hair

    Wavy hair can vary in texture and thickness, but there are some common characteristics that can help you identify if you have wavy hair:

    1. Wave Pattern

    Wavy hair typically forms an “S” shape pattern. If your hair has a natural wave without being tightly coiled or completely straight, you likely have wavy hair.

    2. Volume

    Wavy hair tends to have more volume and body compared to straight hair. If your hair looks full and bouncy, it might be wavy.

    3. Frizz

    Wavy hair is prone to frizz due to its texture. If you notice that your hair tends to frizz up in humid weather or lacks definition, you might have wavy hair.

    Simple Ways to Check If You Have Wavy Hair

    Now that you know the characteristics of wavy hair, let’s explore some simple methods to check if you have wavy hair:

    1. The Wet Hair Test

    Step 1: Wash your hair and allow it to air dry without using any styling products.

    Step 2: Observe the natural pattern as your hair dries. If it forms gentle waves or curls, you likely have wavy hair.

    2. The Scrunch Test

    Step 1: Apply a small amount of mousse or curl-enhancing product to damp hair.

    Step 2: Gently scrunch your hair with your hands and let it dry naturally. If your hair holds a wavy texture, you probably have wavy hair.

    3. The Ponytail Test

    Step 1: Gather your hair into a loose ponytail without pulling it too tight.

    Step 2: Notice how your hair naturally falls. If you see waves or curls forming in the ponytail, you likely have wavy hair.

    Caring for Wavy Hair

    Once you’ve identified that you have wavy hair, it’s important to take care of your waves to keep them looking their best. Here are some tips for caring for wavy hair:

    1. Use a Moisturizing Shampoo and Conditioner

    Wavy hair tends to be drier than straight hair, so opt for moisturizing hair products to keep your waves hydrated and healthy.

    2. Avoid Heat Styling

    Excessive heat styling can damage wavy hair and cause frizz. Try to air dry your hair whenever possible or use heat protectant products before using styling tools.

    3. Embrace Your Natural Texture

    Avoid over-brushing your wavy hair as it can disrupt the natural wave pattern. Embrace your waves and allow them to air dry for a natural look.

    Identifying if you have wavy hair is the first step towards understanding how to care for your unique hair type. By recognizing the characteristics of wavy hair and following the tips provided in this article, you can enhance the beauty of your waves and rock your natural texture with confidence.

    Signs You Have Wavy Hair | Curlsmith

    Frequently Asked Questions

    How can I determine if my hair is wavy?

    To identify if you have wavy hair, you can allow your hair to air dry without any styling products. Wavy hair typically falls in a loose S-shape pattern. If your hair has some bends or curves but is not tightly coiled like curly hair or entirely straight, then you likely have wavy hair.

    What are some common characteristics of wavy hair?

    Wavy hair often tends to have a natural volume and texture, with a tendency to frizz in humid conditions. It can vary in intensity from subtle waves to more pronounced waves depending on individual hair types. Wavy hair is versatile and can easily be styled with the right products to enhance the waves.

    Can I determine my hair type by observing how it reacts to certain products or techniques?

    Yes, you can experiment with different hair care products and techniques to see how your hair responds. For wavy hair, using lightweight products that enhance waves without weighing them down can be beneficial. Techniques like scrunching and diffusing can also help bring out the natural waves in your hair.

    Final Thoughts

    To identify if you have wavy hair, observe natural air-dried hair texture, and look for a subtle S-shaped pattern. If your hair doesn’t fall completely straight or form tight curls, you likely have wavy hair. Pay attention to how your hair behaves after washing and avoid brushing it when dry to preserve the waves. Embrace your wavy hair by using products specifically designed for wavy textures for enhanced definition and manageability. Understanding the unique characteristics of wavy hair is key to achieving the best results in styling and care routines.

  • Distance Between La Fortuna And San Jose Costa Rica: Explained

    Distance Between La Fortuna And San Jose Costa Rica: Explained

    La Fortuna stands 80 miles north of San Jose, Costa Rica. Nestled at the base of the majestic Arenal Volcano, this charming town is a haven for nature lovers and adventure seekers alike. Whether you’re seeking relaxation in its hot springs, exploring the lush rainforests, or embarking on thrilling outdoor activities, La Fortuna has something for everyone. Join us as we delve into the enchanting journey of how far is La Fortuna from San Jose, Costa Rica, and uncover the secrets this captivating destination holds.

    Distance between La Fortuna and San Jose Costa Rica: Explained

    How Far is La Fortuna from San Jose, Costa Rica?

    Welcome, explorers! If you’re planning a trip to Costa Rica and wondering about the distance between La Fortuna and San Jose, you’ve come to the right place. In this guide, we’ll delve into the details of this journey, exploring the various transportation options, the scenic routes, and the exciting pit stops along the way. So sit back, relax, and let’s embark on this virtual adventure together!

    Understanding the Distance

    First things first, let’s get a clear picture of how far La Fortuna is from San Jose. La Fortuna is a charming town located in the northern part of Costa Rica, known for its stunning Arenal Volcano and lush rainforests. On the other hand, San Jose is the vibrant capital city of Costa Rica, situated in the central valley. The distance between these two destinations is approximately 81 miles (130 kilometers).

    Transportation Options

    Now that we have a grasp of the distance, let’s talk about how you can travel from San Jose to La Fortuna. There are several transportation options available, depending on your preferences and budget.

    1. Driving:

    One of the most popular ways to reach La Fortuna from San Jose is by driving. The journey takes around 3 to 4 hours, depending on traffic and road conditions. The route offers breathtaking views of Costa Rica’s countryside, with lush forests and rolling hills along the way. Make sure to have a valid driver’s license and familiarize yourself with Costa Rica’s traffic rules before hitting the road.

    2. Shuttle Service:

    If you prefer a more relaxed and hassle-free journey, you can opt for a shuttle service from San Jose to La Fortuna. These shuttle services are comfortable, convenient, and often include pick-up and drop-off options at major hotels in both cities. The travel time is similar to driving, but you can sit back and enjoy the scenery without worrying about navigating the roads.

    3. Public Bus:

    For budget-conscious travelers, taking a public bus from San Jose to La Fortuna is a viable option. While the journey may take a bit longer due to multiple stops along the way, it provides an authentic local experience and a chance to interact with fellow passengers. The bus ride allows you to witness everyday life in Costa Rica up close.

    Scenic Routes and Pit Stops

    As you travel from San Jose to La Fortuna, you’ll be treated to some of Costa Rica’s most stunning landscapes. The route is dotted with picturesque vistas, charming towns, and exciting attractions that are worth exploring. Here are some scenic routes and pit stops you shouldn’t miss:

    Arenal Volcano National Park:

    As you approach La Fortuna, you’ll have the opportunity to visit the renowned Arenal Volcano National Park. This iconic volcano, surrounded by lush forests and hot springs, offers a range of outdoor activities such as hiking, zip-lining, and wildlife spotting. Don’t forget to snap a photo of the majestic volcano as a keepsake of your journey!

    La Fortuna Waterfall:

    A short drive from the town center of La Fortuna, you’ll find the spectacular La Fortuna Waterfall. Cascading from a height of 75 meters into a crystal-clear pool, this natural wonder is a must-visit for nature enthusiasts and adventure seekers. Take a refreshing dip in the cool waters or hike the surrounding trails for a memorable experience.

    Sarapiqui River:

    Considered one of Costa Rica’s most scenic rivers, the Sarapiqui River is a paradise for nature lovers and bird watchers. Take a break from your journey and embark on a river safari or a thrilling rafting adventure to explore the rich biodiversity of the region. Keep your camera ready to capture close encounters with exotic wildlife along the riverbanks.

    So, how far is La Fortuna from San Jose, Costa Rica? Approximately 81 miles of picturesque landscapes, thrilling adventures, and unforgettable memories await you on this journey. Whether you choose to drive, take a shuttle, or hop on a public bus, the road from San Jose to La Fortuna is filled with surprises at every turn. So pack your bags, grab your camera, and get ready to explore the natural beauty and cultural richness of Costa Rica. Your adventure awaits!

    Thank you for joining us on this virtual trip. We hope this guide has provided you with valuable insights and inspiration for your upcoming travels. Safe journey and happy exploring!

    How Far Is La Fortuna From San Jose Costa Rica? – Central America Uncovered

    Frequently Asked Questions

    How long does it take to travel from San Jose to La Fortuna in Costa Rica?

    It typically takes around 3 to 4 hours to drive from San Jose to La Fortuna. The distance between the two places is approximately 80 to 90 miles, depending on the specific route taken. The journey offers scenic views of the Costa Rican countryside and may involve navigating through winding mountain roads.

    What are the transportation options available for traveling from San Jose to La Fortuna?

    Travelers can choose between various transportation options when going from San Jose to La Fortuna. Some popular choices include taking a shuttle bus, driving a rental car, or booking a tour package that includes transportation. Each option offers different advantages in terms of flexibility, convenience, and cost.

    Is it possible to fly from San Jose to La Fortuna?

    While there is no direct flight between San Jose and La Fortuna, travelers have the option to take a domestic flight to the nearest airport, which is located in the town of La Fortuna. The flight duration is relatively short, offering a quick and convenient way to reach La Fortuna from San Jose.

    Final Thoughts

    La Fortuna is located approximately 80 miles northwest of San Jose, Costa Rica. This distance can be covered in about 3.5 to 4 hours by car, making it a manageable journey for those looking to visit the popular tourist destination. The scenic drive offers travelers the chance to experience the beautiful landscapes of Costa Rica, from lush forests to volcanic mountain ranges. Whether you choose to drive yourself or take public transportation, getting to La Fortuna from San Jose is a worthwhile adventure in itself.

  • Create Devil’S Toothpaste: How To Make It At Home In 55 Characters

    Create Devil’S Toothpaste: How To Make It At Home In 55 Characters

    Creating devil’s toothpaste is a thrilling experiment that combines science and art. To make devil’s toothpaste, all you need is a few simple ingredients and a spark of creativity. This explosive concoction is not your ordinary toothpaste, but a mesmerizing display of chemical reactions. Get ready to dive into the exciting world of making devil’s toothpaste and impress your friends with this eye-catching demonstration. Let’s uncover the secrets behind this electrifying DIY project.

    Create Devil's Toothpaste: How to Make It at Home in 55 Characters

    How to Make Devil’s Toothpaste: A Fun and Explosive Science Experiment

    Welcome, young scientists! Today, we are going to embark on an exciting adventure into the world of chemistry by learning how to make Devil’s Toothpaste, a foamy and explosive concoction that will leave you in awe. This experiment is not only fun but also educational, allowing you to witness the fascinating reaction between different chemicals. Are you ready to dive in and create some magic? Let’s get started!

    The Science Behind Devil’s Toothpaste

    Before we jump into the hands-on part, let’s take a moment to understand the science behind Devil’s Toothpaste. This experiment involves a chemical reaction called the decomposition of hydrogen peroxide into water and oxygen gas. When a catalyst, such as potassium iodide or dish soap, is added to the hydrogen peroxide solution, it speeds up the reaction, resulting in the rapid release of oxygen gas. This release of gas creates bubbles, leading to the foamy eruption that gives Devil’s Toothpaste its name.

    Materials You Will Need

    Now, let’s gather all the necessary materials to create Devil’s Toothpaste:

    Ingredients:

    • Hydrogen Peroxide (6% or higher concentration)
    • Dish Soap
    • Food Coloring (optional)
    • Dry Yeast
    • Warm Water
    • Plastic Bottle

    Equipment:

    • Measuring Spoons
    • Measuring Cup
    • Bowl
    • Spoon
    • Safety Goggles

    Step-by-Step Instructions

    Now, it’s time to put on your safety goggles and follow these simple steps to create your own Devil’s Toothpaste:

    Step 1: Prepare the Mixture

    In a bowl, mix 1/2 cup of hydrogen peroxide with a few drops of dish soap. You can also add a few drops of food coloring if you want to make your foamy explosion extra colorful!

    Step 2: Activate the Yeast

    In a separate cup, mix 1 tablespoon of dry yeast with 2 tablespoons of warm water. Stir the mixture until the yeast dissolves and becomes frothy.

    Step 3: Combine the Ingredients

    Pour the yeast mixture into the bottle containing the hydrogen peroxide solution. Quickly step back and watch the magic happen!

    Step 4: Witness the Explosion

    As soon as the yeast mixes with the hydrogen peroxide, the reaction will start, leading to a rapid expansion of foam bursting out of the bottle. Watch in amazement as Devil’s Toothpaste erupts before your eyes!

    Safety Tips

    While conducting this experiment, safety should always be a top priority. Remember to wear your safety goggles to protect your eyes from any splashes. Additionally, ensure adult supervision, especially when handling chemicals. Never ingest any of the materials used in this experiment, and wash your hands thoroughly after completing the activity.

    Experiment and Have Fun!

    Congratulations, young scientists! You have successfully created your own Devil’s Toothpaste and witnessed the power of chemistry in action. Feel free to experiment with different ingredients and proportions to see how they affect the results. Remember, science is all about exploration and discovery, so don’t be afraid to get creative! Have fun creating more foamy eruptions and sharing this exciting experiment with your friends and family.

    Stay curious, stay safe, and keep exploring the wonders of science!

    Mark Rober's Secret Devil's Toothpaste Recipe Revealed

    Frequently Asked Questions

    What ingredients are needed to make devil’s toothpaste?

    To make devil’s toothpaste, you will need hydrogen peroxide, dish soap, food coloring, and dry yeast. These ingredients are essential in creating the foamy and colorful reaction that characterizes devil’s toothpaste.

    How do you make devil’s toothpaste step-by-step?

    First, mix 1/2 cup of hydrogen peroxide with a few drops of food coloring in a plastic bottle. Then, add a squirt of dish soap and swirl gently to combine. In a separate container, mix warm water with a packet of dry yeast. Finally, pour the yeast mixture into the bottle with the other ingredients and watch as the foam erupts like toothpaste!

    Can devil’s toothpaste be used for any practical purposes?

    Devil’s toothpaste is primarily used as a fun and colorful science experiment to demonstrate an exothermic reaction. It should not be used for dental hygiene purposes as it contains ingredients that are not safe for oral use.

    Final Thoughts

    In conclusion, making Devil’s Toothpaste is a simple and exciting experiment that anyone can try at home. By mixing hydrogen peroxide, dish soap, and potassium iodide, you can create a foamy and explosive reaction that is both fun and educational. Remember to wear safety goggles and gloves while conducting the experiment, and always follow the instructions carefully to ensure a successful outcome. So, gather your materials and get ready to make Devil’s Toothpaste for a unique and entertaining science experience.